

Projects:
GTO
My
67 Pontiac GTO
Trunk Body Work
-Trunk pans
-Wheel wells
Body Work Part 1
-Rear Quarters
-Rear Door Jambs
-Window Reveals
Body Work Part 2
-Cowl
-Pillar
-Rocker
Body Work Part 3
-Windshield channel
-Doors
-Fenders
GTO Paint
-Filler work
-Priming
-Blocking
GTO Frame Work
GTO Convertible Top Pt 1
-Top Frame
GTO Convertible Top Pt 2
-Top Trim
GTO Drivetrain
-Engine
-Quadrajet Rebuild
-Exhaust
-Axle
Muncie
Rebuild
popular
Auto to Manual Swap
1967
Ram Air GTO
story
Wheelhouse Filler template PDF
Willys CJ3A
CJ3A Intro
Engine and REBUILD
Drivetrain
BodyWork 1
BodyWork 2
BodyWork 3
BodyWork 4
Paintwork 1
Paintwork 2
Final Assembly
Final Assembly 2
Electrical System
Other Rods
TJ Wrangler Rubicon
CJ7
CJ8
Triumph TR4
Decrepid Dakota
Powerdyne Minibike
Allis Chalmers B engine rebuild Part 1
Allis Chalmers B engine rebuild Part 2
Allis Chalmers Generator to Alternator conversion
Gizmos
Stereo camera
rig
Stereo mic preamp
About:

Feeds

Markup
GTO Body work Part 2
This is the second page of the bodywork section of the GTO. This deals mostly with the front part of the body "tub". Too see the first part of the bodywork section, go here.
Front Body Hinge Pillar (Kick panel) Repair on the Goat
August 30, 2010
After finishing up most of the metal work on the rear of the car, I started to disassemble the front clip and remove everything under the dash so I could remove the insulation-turned-to-dust and paint everything under there.
I removed the plastic kick panels and found massive maloderous rodent nests in the lower cowl/shrouds. I stirred up some impressive funk.
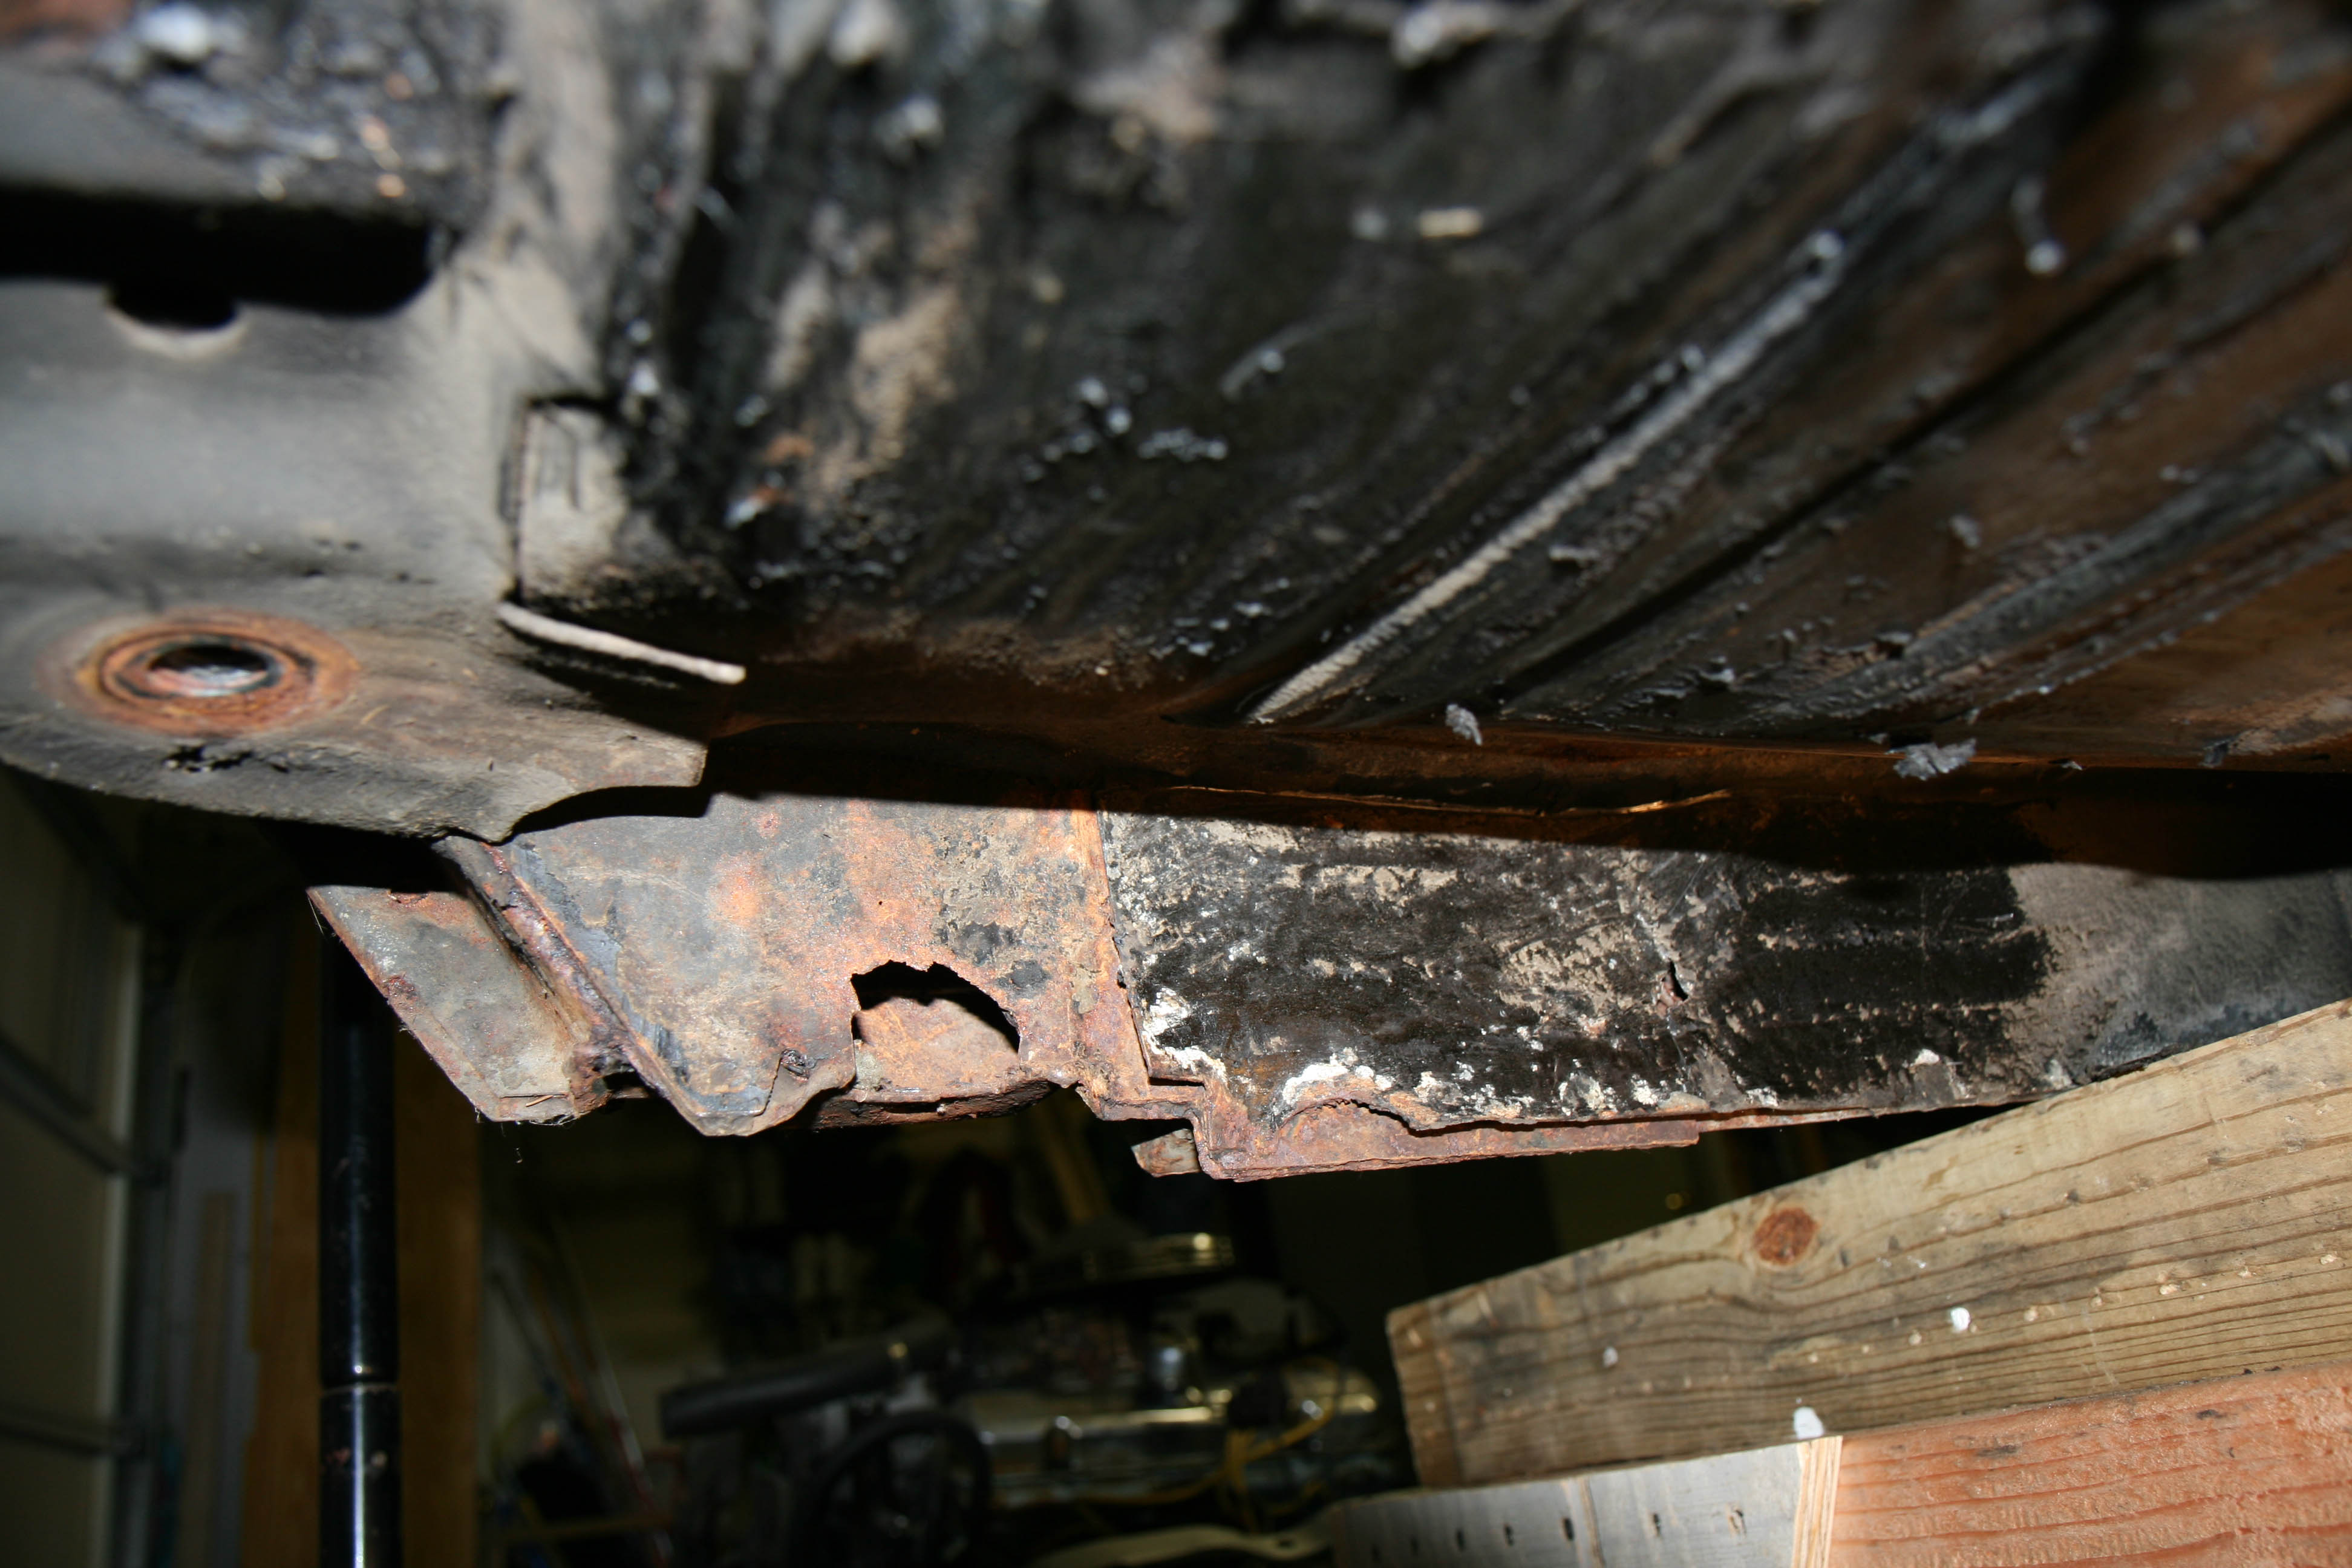
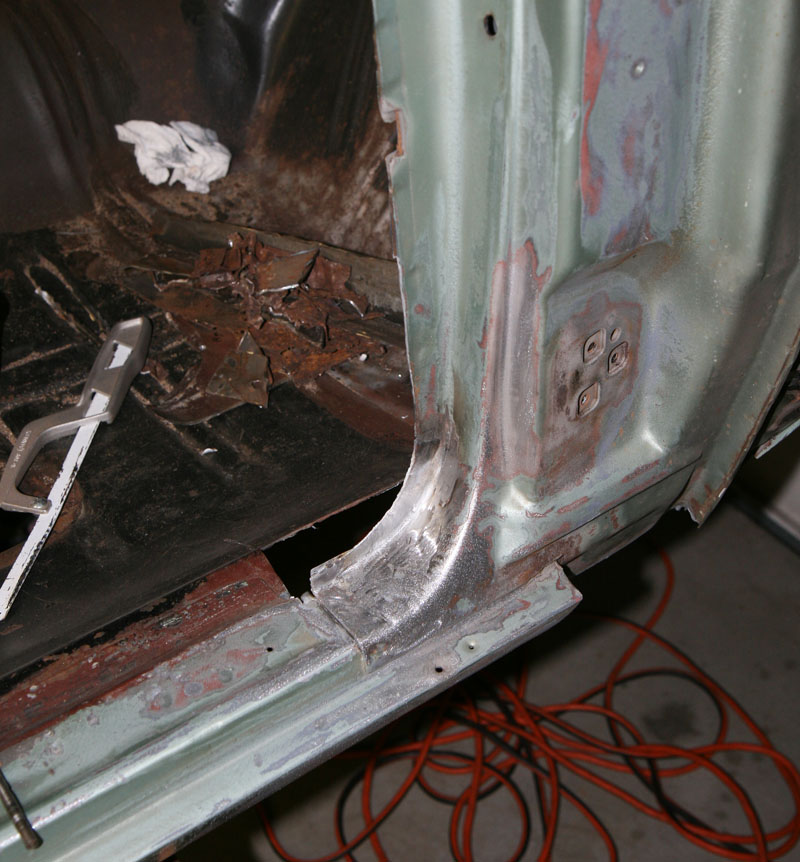
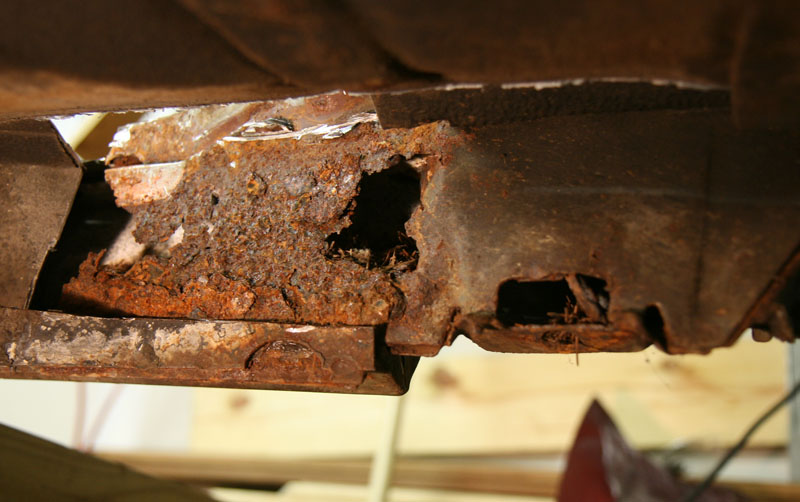
After cleaning this all out, I got under the car and inspected the bottom of the rocker panel seam where it meets the "front body hinge pillar assembly" (this is what GM called it). There is a fat pinch-weld sandwich of metal that consists of the outer rocker panel, a 16 gauge inner front body hinge pillar stamping, a 14 gauge reinforcement plate, and then the inner rocker plate. The pinch-weld was swollen a bit, but I didn't think it was too big a deal. The frame hides a good view of the inside of the rocker. Once I removed the plastic kick panel however, I saw small holes on the inside pillar metal. Digging deeper revealed soft spots under the inner rocker plate.
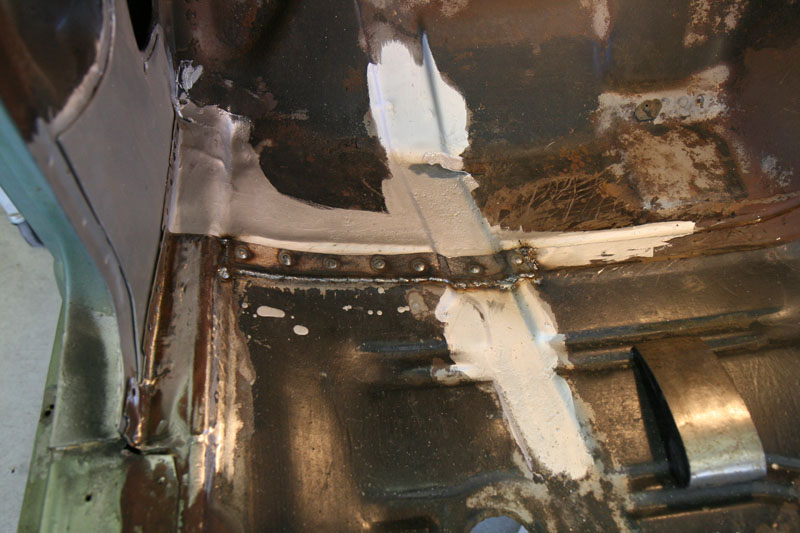
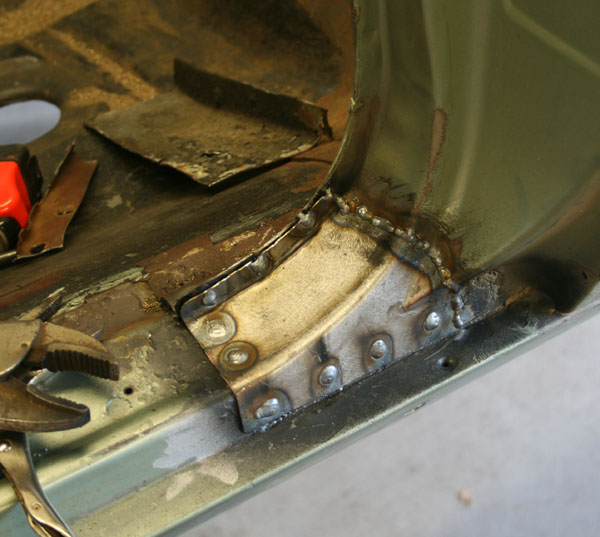
In the photo below, the black painted section is the inner rocker panel. This was mostly intact, but underneath and to the left is the metal sandwich that had no paint and consequently rusted. The hole seen in the center is supposed to be there, but not rusted oversized. This is the access hole for the J-nut for the front fender.
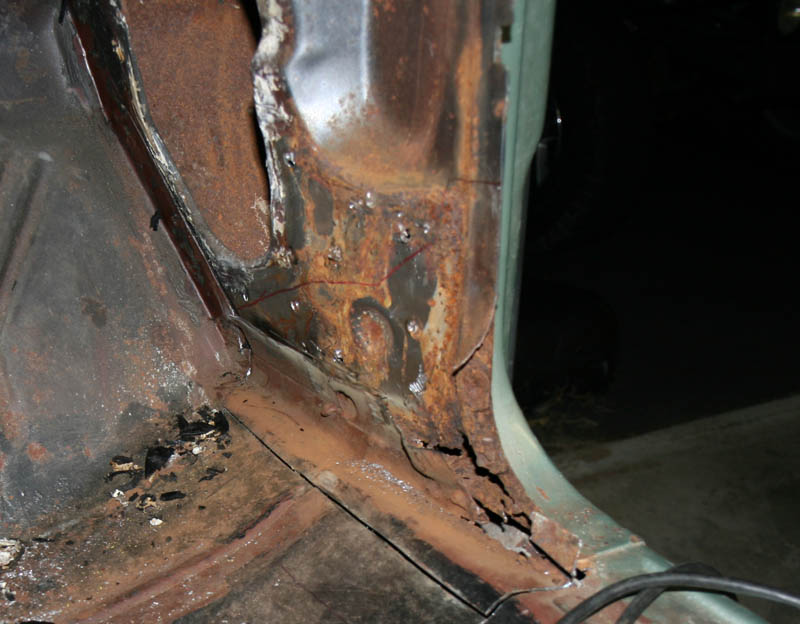
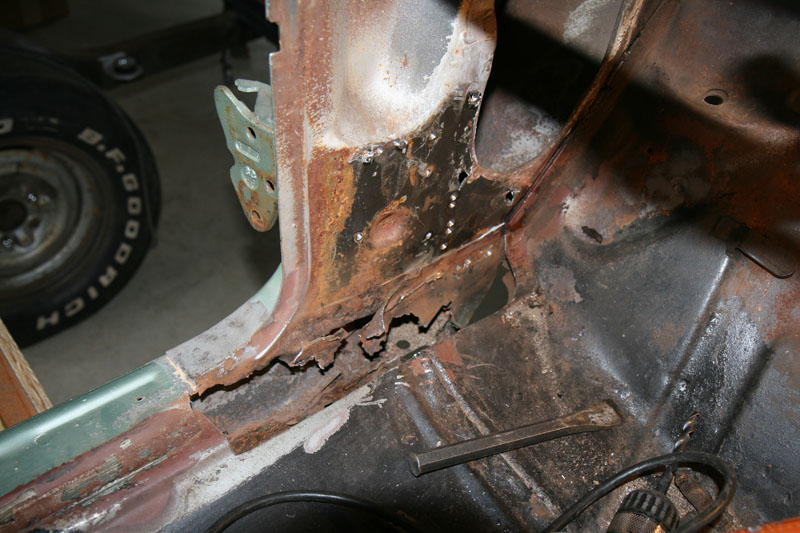
Here's the view of the inside after I removed some of the 14 gauge reinforcement plate. I also started to slit the floor in preparation for removal. The reinforcement plate goes from halfway up the kickpanel down to the bottom rocker flange. The sandwich of metal was never painted. The metal stampings also rusted near the curve of the pillar (I'll just call it the "foot"). The outside of the "foot" had a pinhole too after sand blasting.
After staring at this for a couple days, I steeled myself for more unexpected repair. To get to the lower pillar area down by the rocker, the body needed to come off the frame.
I spent an evening tackling the body mount bolts. About 6 came out like they went in yesterday, 4 came out with some effort, 2 came out with major effort and 2 bolts snapped.
The two broken studs were tackled with a brand new pair of vise grips and copious amounts of MAPP gas (oops, sorry, MAPP gas substitute..can't buy MAPP gas anymore) heat. Thankfully these broken studs twisted out. No captive nuts/plates spun out of their retaining tabs in the body. Whew.
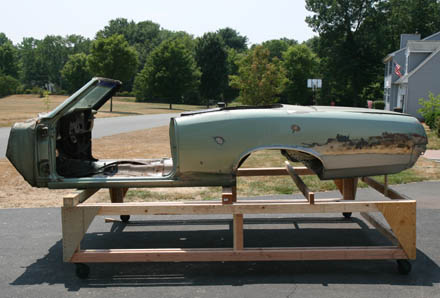
I fashioned a body dolly from 65 dollars worth of lumber, screwed on some ancient crusty casters, and jacked the body up with a couple bottle jacks, a floor jack, and a load of wood cribbing. I plopped the body onto the wood dolly and rolled the frame out. I did not find it necessary to add struts or bars across the door gaps. I made a ton of measurements across various points of the body before and after I removed the body. Nothing moved or was "springy".
With the body off the frame and up in the air, I started to do the demolition work to get rid of the rot. I cut the floor pan near the kickpanel (and this was painful because the floor pan is not rusted) to gain access to the complete kickpanel / pillar assembly metal sandwich. This metal is thick stuff and was not fun to remove. Eventually I got all the damaged metal removed. I sandblasted the complete interior of the pillar/kickpanel as well as the inside of the rocker panel. Thankfully the door hinge brackets, as well as the outer pillar panels were in excellent shape.
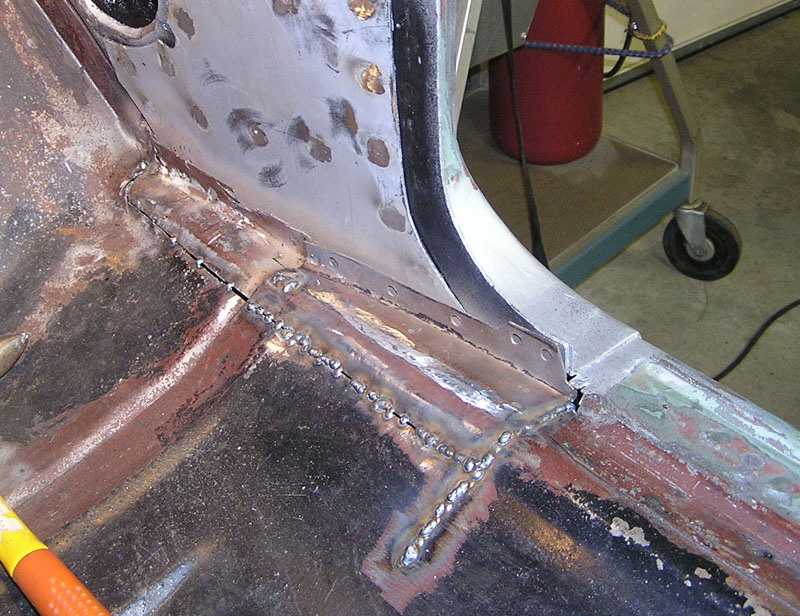
This is a pretty complex area where lots of metal comes together. Click on the picture below to see what's what.

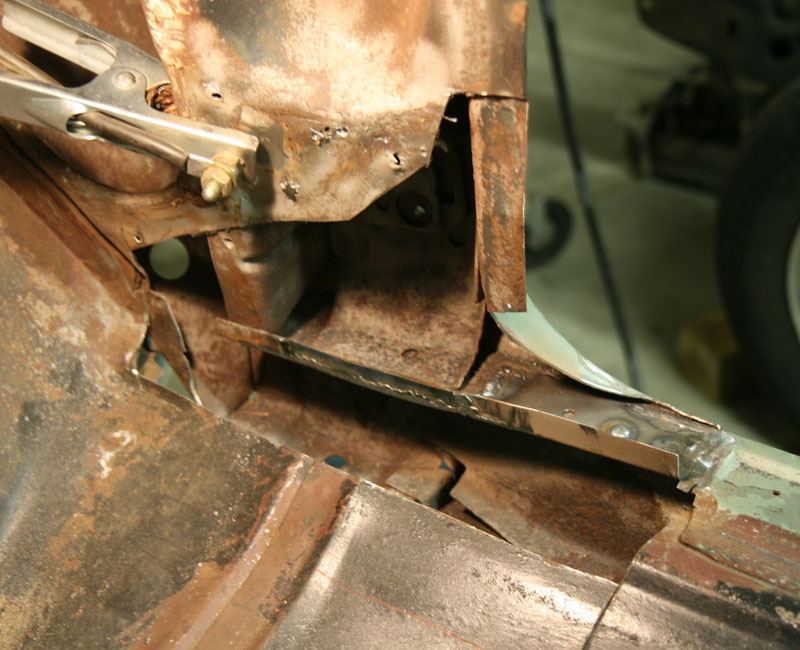
Here's the inside view of the pillar assembly after sand blasting (see below). Note that I cut off the outside section of the "foot" of the pillar. This allowed me to access to the top of the previously hidden section of rocker and repair it, as well as fix the pin-holed foot itself. The damaged top flat section of the rocker was removed and what you see under it is a thick convertible-only C-channel that runs all along the inside of the rocker. The top of the flange is coated with weld-thru primer.

Here's a new piece welded in that is essentially the top of the rocker that's hidden inside the door pillar:
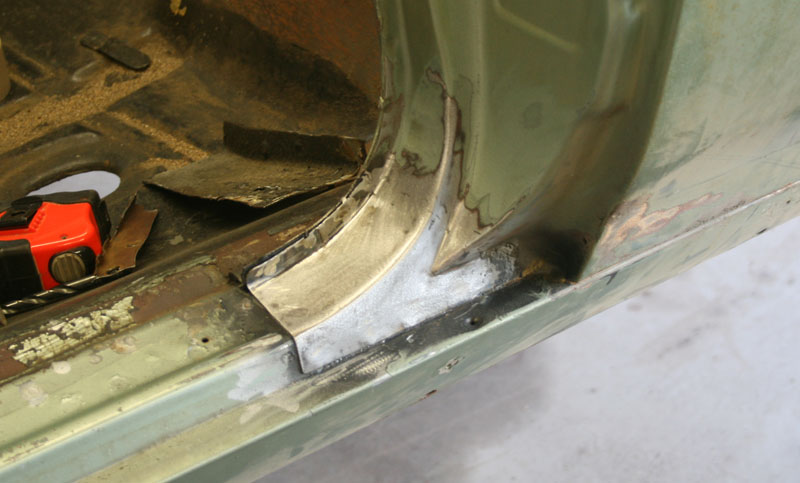
The pillar "foot" was then patched and welded into place, then smoothed:
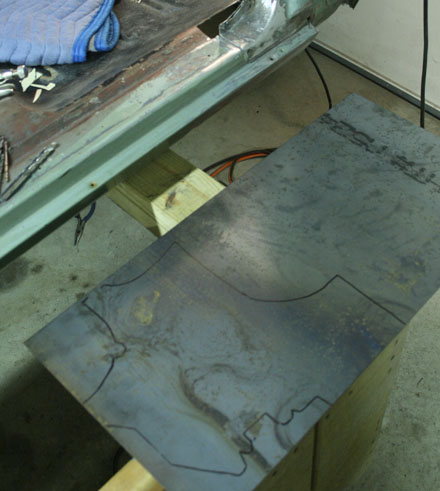
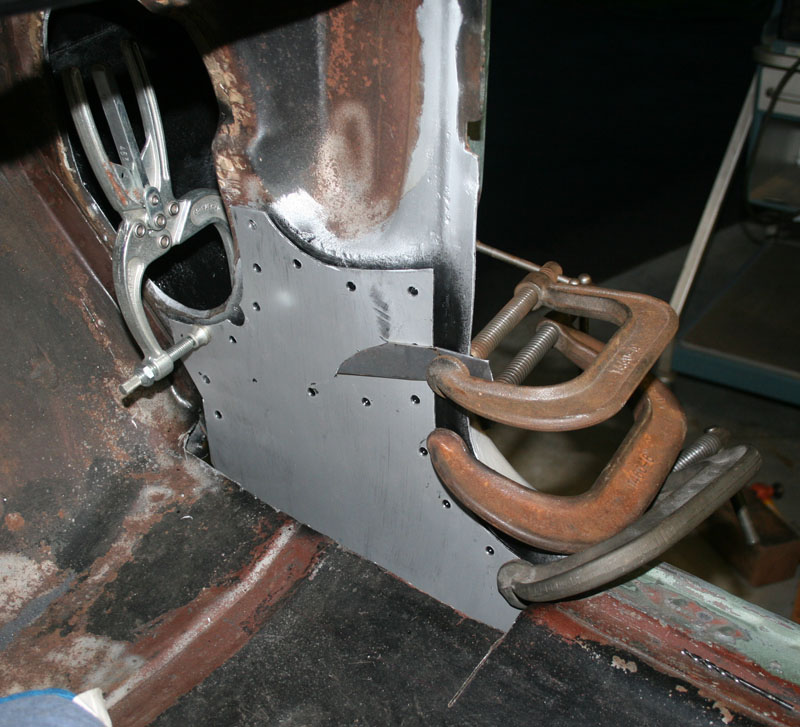
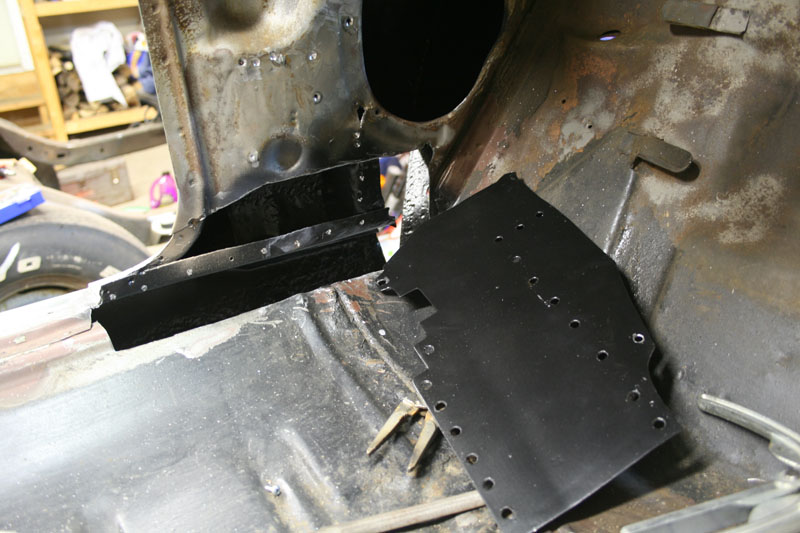
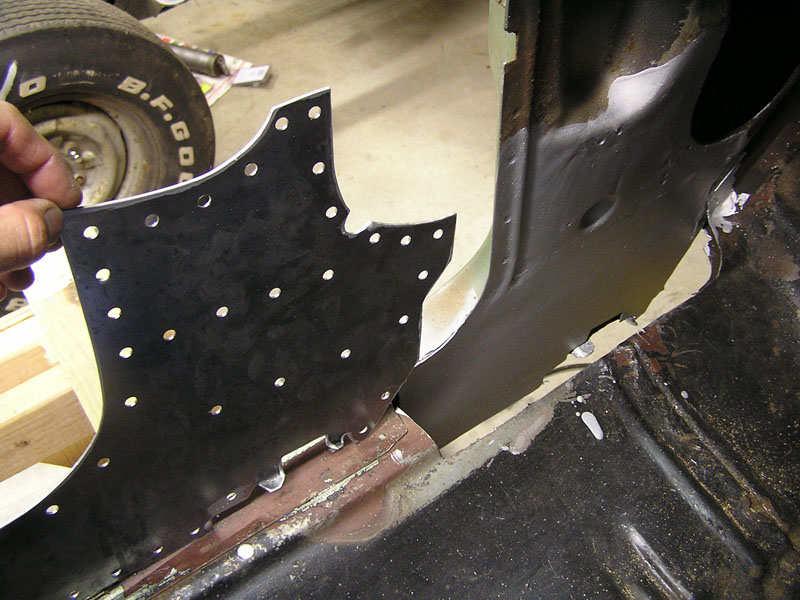
The whole cavity area of the pillar assembly was coated with primer and paint and a template was made to help fabricate the 16 gauge inside wall pillar patch.

I used an old farm implement guard as a donor for the 16 gauge patch.
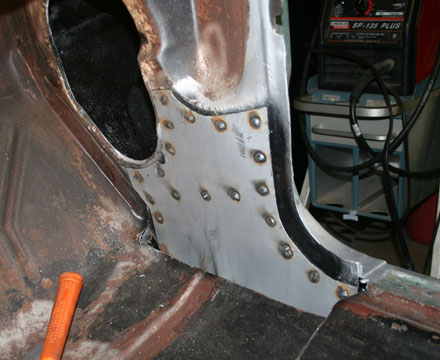
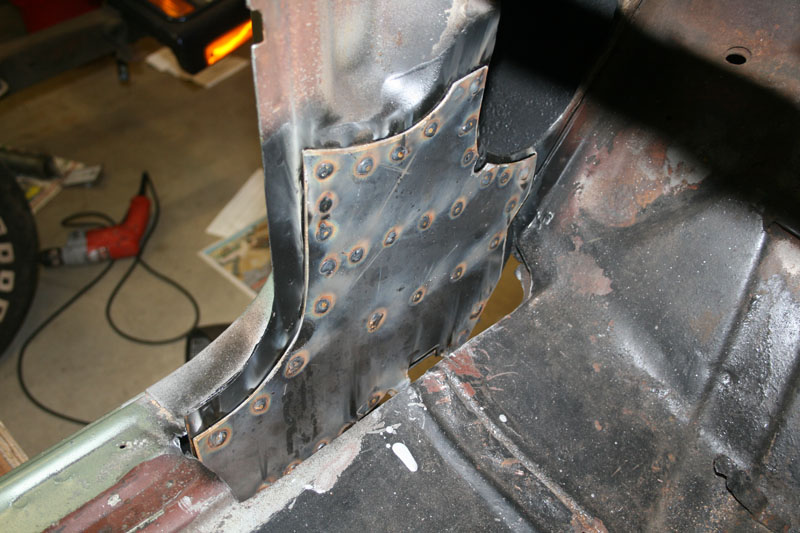
The patch was coated and drilled for plug welds. It was butt welded to the original metal on top and plug welds were used where it was previously spot welded to the hinge bracing inside the pillar cavity.
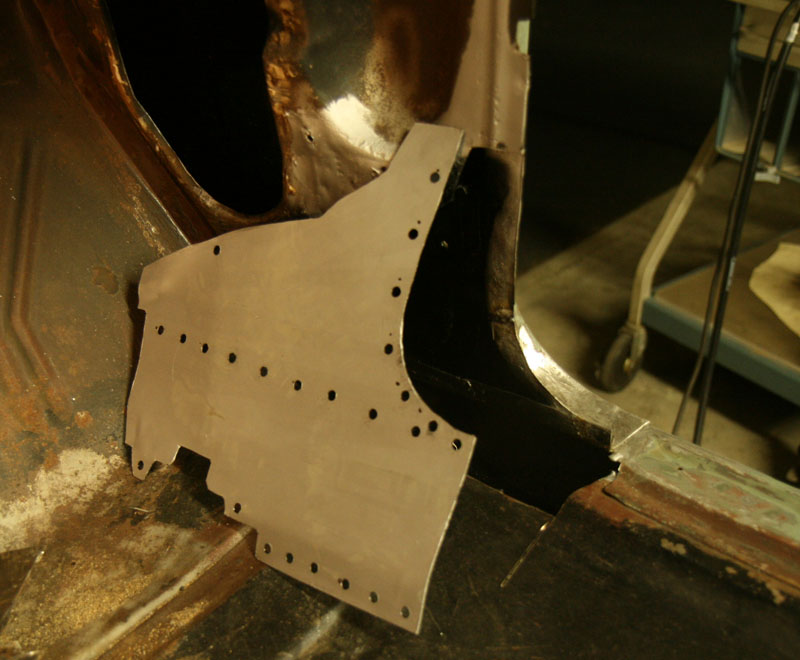
The patch is fully welded in. As mentioned above it was butt welded to the undamaged pillar metal on top, plug welded to the inside structure, and plug welded to the bottom of the rocker panel flange.

Sandwiched on top of the 16 gauge panel is the 14 gauge reinforcement plate. I had a hard time finding a source for this 0.075" thick sheet metal. I finally sourced it from metalsdepot.com. They only offer hot rolled in this thickness, so it's got mill scale, but it's still beautiful stuff. Easily formed and cut.
I made another template for this piece, and cut it out with my cut off wheel, and shaped the edges.
This piece was welded in with plug welds, to simulate the original spot welds.
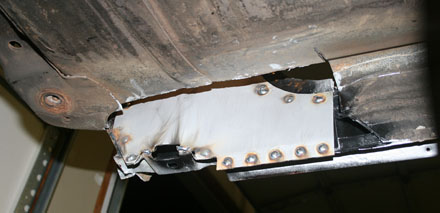
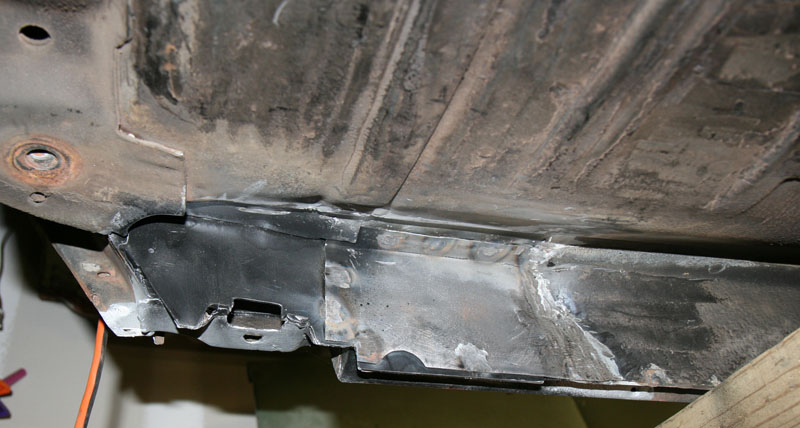
Here's the 14 gauge plate as seen from under the car. It sits right over the 16 gauge piece:
Next was to replace the floor that I had removed. I used the original pieces, except I did have to make a new flange (new flange already welded and smoothed and has holes ready for plug welds) on the rear-most piece as I mangled it upon removal. The floor sections are partially welded in here:
Finally, the 20 gauge inner rocker panel piece was fabricated to match the original piece that was previously removed; it extends up to about an inch away from the J-nut access hole.
This was an easy piece to make. Grinding the inside corner welds was not easy though. It's partially shrouded by the dipping floor pan. But that essentially completes the repair.
Driver side Hinge Pillar repair
October 3rd, 2010
I spent late August and early September on the driver side hinge pillar repair. The driver side was not as bad as the passenger side, but it still required complete deconstruction and repair. Warning...there's a ton o' pix here....
I tore off the inside rocker panel and found the 14 gauge piece pretty much rotted out. But thankfully the rocker inside and the pillar on the outside of the car were in excellent shape, just needing blasting and painting.
Despite the 14 gauge only having damage down by the rocker, I removed the whole part. Here's a shot of the 16 gauge underneath. The floor pieces have been removed to make room to work.
The 16 gauge piece was removed about to about halfway up. I removed more than necessary only to get access to the inside of the pillar and sandblast everything, prime and paint. This picture below shows it all ready for the replacement 16 gauge patch.
16 gauge patch piece welded, ground down and smoothed.

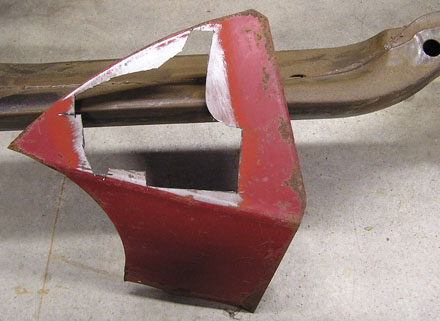
The 14 gauge piece was fabricated and it's now ready to weld on as seen below.
It's now welded on and the pillar is done.
Floor Pan Repair
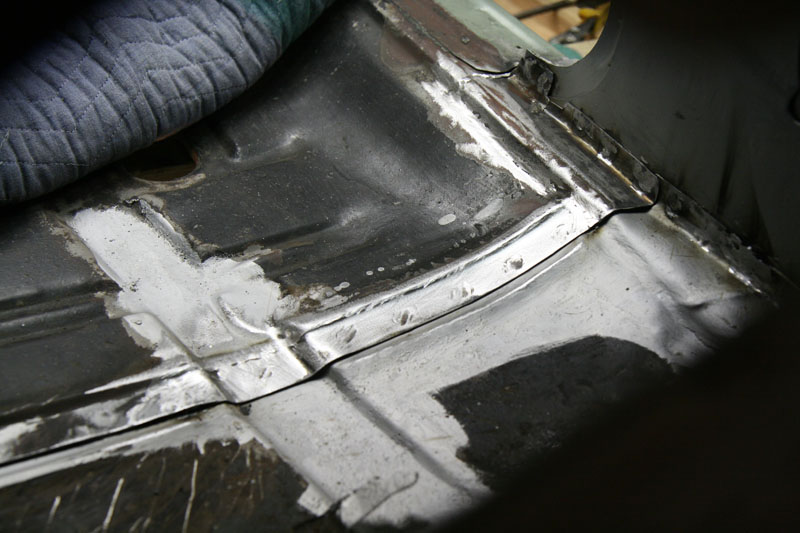
On to the floor. The original floor pieces were re-installed. Note the "swollen" floor seam at the bottom of the picture.

It's about 6 inches in length and while there were no holes, it looked like trouble, so I cut it out.

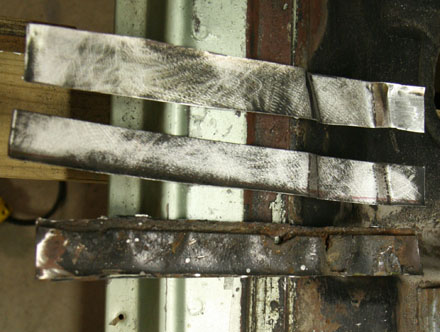
The flanges of both pans have a bead next to the overlap area, presumably for strength. I cut on the top of the bead.
I wanted to duplicate the original overlap style seam, so I made two pieces; the firewall pan flange and the main floor pan flange. Here are the new pieces and the rusted original chunk. The folds on the right are for the wiring harness to lay in.
The firewall pan flange is on the bottom, so I started with that piece. Here it is welded in. Note I also at this time ground down the sectioned floor pans that I re-installed next to the hinge pillar.
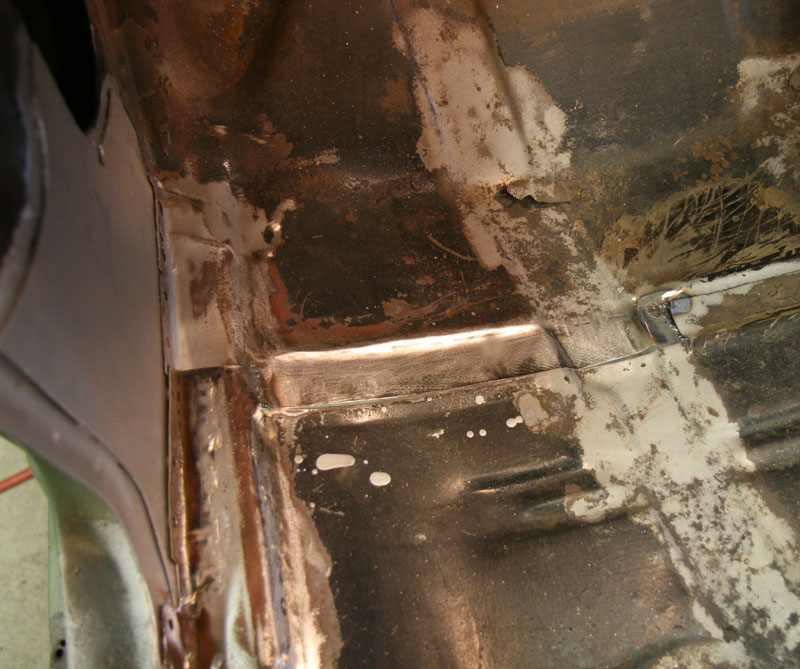
The top floor pan patch is now welded in.
Here's a view from the steering column hole in the firewall looking back.
Quarter panel "foot" repair
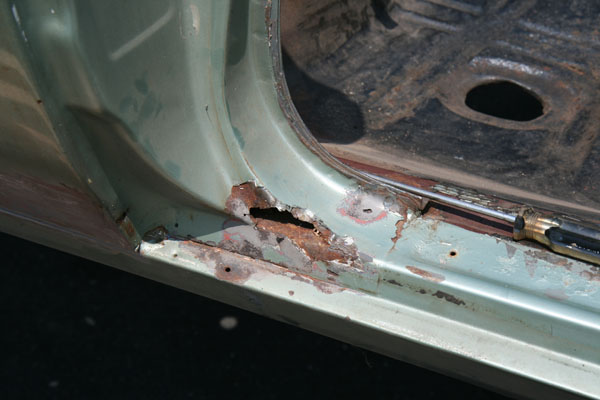
While sandblasting the hinge pillar areas, I made a few exploratory "blasts" around the sheet metal that I hadn't checked out yet. There was a very tiny bubble near the rear quarter at the foot of the rear door opening on the passenger side (didja get all that?). Well, it turned into a pinhole. I dug at it with a screw driver and created a nice big hole. Argh.
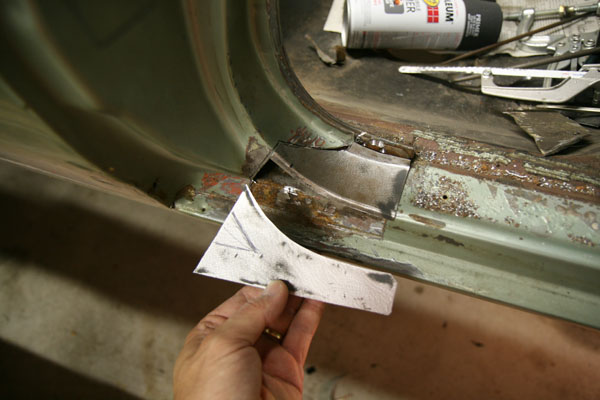
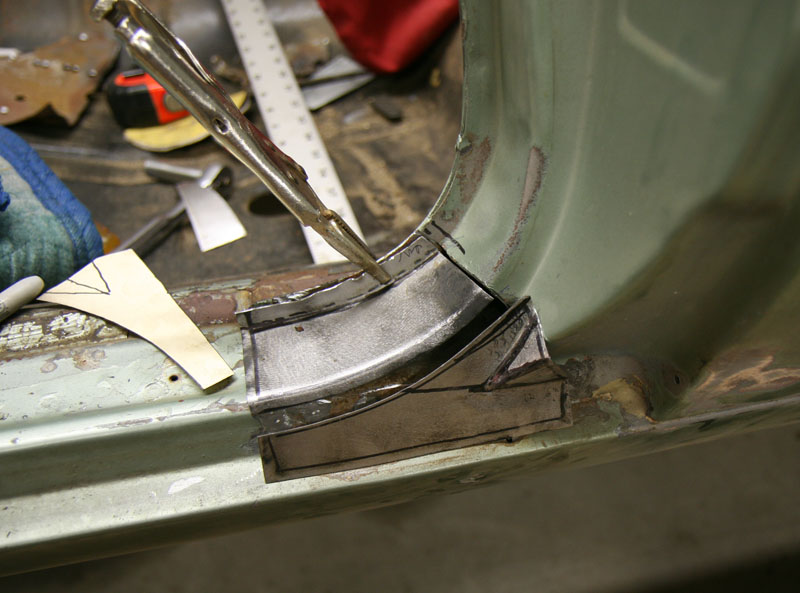
I did the same on the driver side and found some more thin areas. I cut both "feet" off. These are pretty complex shaped areas, so I made the patches in two pieces. The wide area was fabricated first. The small flanges on either side aren't too wide and I was able to form the curve by hand on a piece of 4 inch pipe I had laying around. It's already being test fit in the photo below. Also seen is the start of the side piece with the wedge shape crease drawn in.
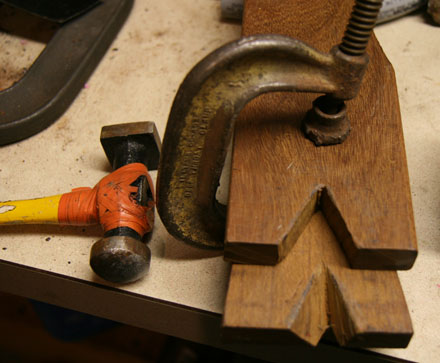
The delta shaped crease was shaped by making a wood form, clamping the metal in between and stretching the metal into the groove cut into bottom chunk of wood. I used a hammer and very dull chisel as a forming tool.
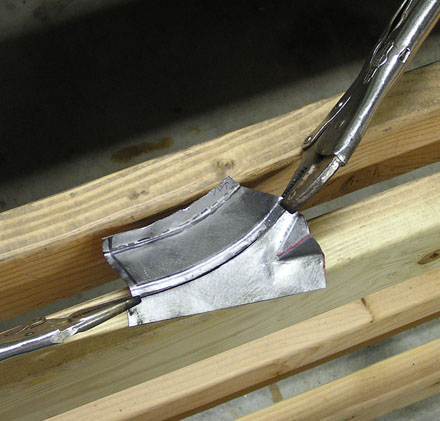
I was making both sides at the same time so I'm switching around here a bit....but here's the two pieces ready to be welded into one.
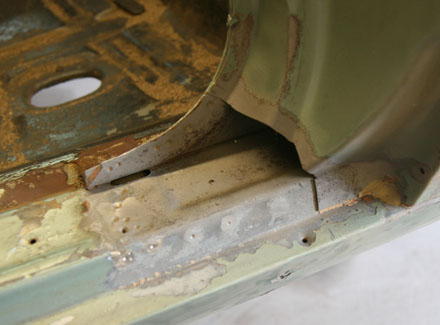
Before installation, I blasted the rocker panel inside, and made sure there was no more surprises. The divots are from drilling out the original metal. (Oh, and some screw holes for the wide GTO rocker trim. This car used the second version of the wide rocker that overlapped on top of the rocker.)
The patch part was ground smooth, I drilled some holes for plug welds, and test fit the part.

Welding ensued....
And grinding and smoothing. Starting to sound like a broken record...
And just for closure, here's the passenger side:

I was very pleased how these came out. In the past I have seen some GTOs on ebay with rust in these areas and thinking no way could that be repaired. But it was actually not bad at all.
So, I declare the metal work done on the tub. I am thinking of cleaning and painting the frame, and then scraping the bottom of the floor pans. Then paint the works. I would love to get the body back on the frame by the December.
Scraping, Grinding, Sanding
December 8, 2010
After completing the "tub" metal work, it was time to think about coating all surfaces not intended to be Linden Green. That leaves alot of surface area. The underside of the car was coated with hard GM undercoating. I spent almost 3 weeks scraping and chiseling. I mostly used a propane torch and various wood and metal scrapers, followed by a grinder with a heavy wire wheel, then a wash of lacquer thinner, then wax and grease remover to remove all residues. The floors looked pretty nice at this point with the original black paint....
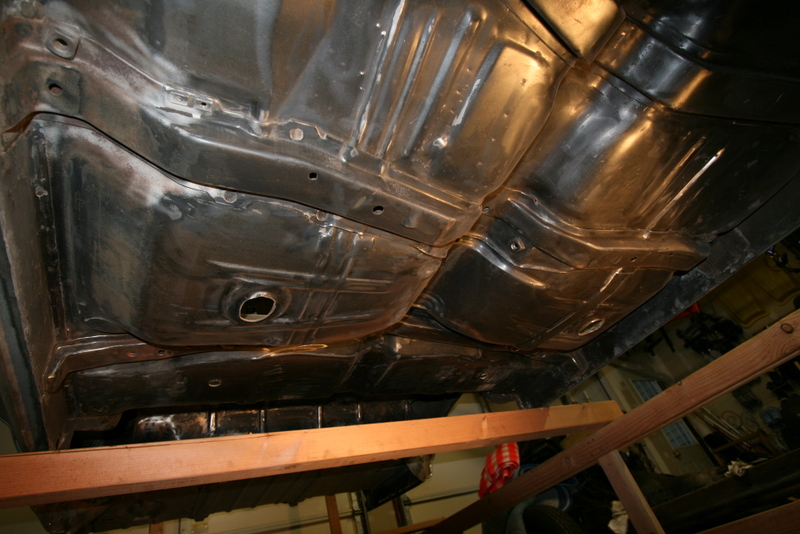
Metal prep was applied to bare metal areas. Finally, I coated all with the Master Series silver primer: (better picture to follow I hope...hard to take pictures of a body on a low slung dolly)
Note the wheel wells with the nice new 3M seam sealer. The 3M tan stuff is VERY nice to work with. Also note the 2 holes in the wheelwell on each side. I believe hardtops have one hole only on each side.
The firewall was in great shape except the old dried up seam sealer had to be removed and replaced. The 3M tan stuff is very nice to work with and can even be sanded to some extent.

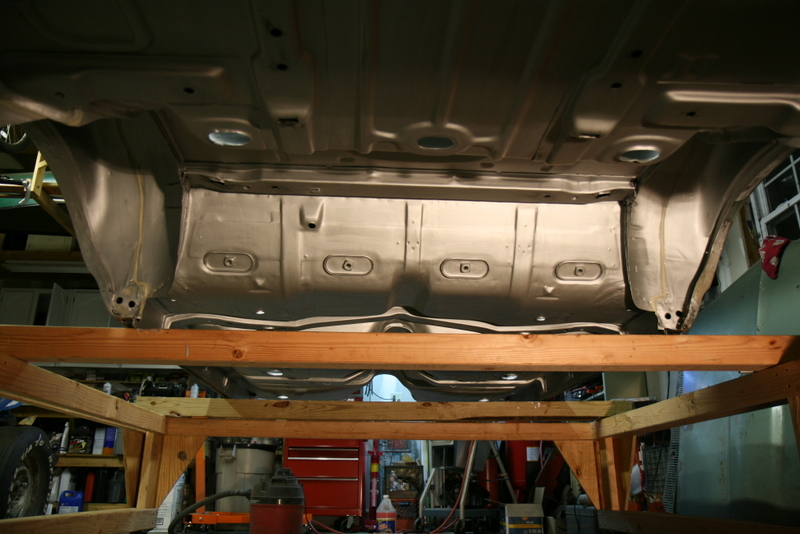
While the body was up in the air on the cart, I painted the complete underside of the floorpans, trunk pans and firewall with a finish coat.
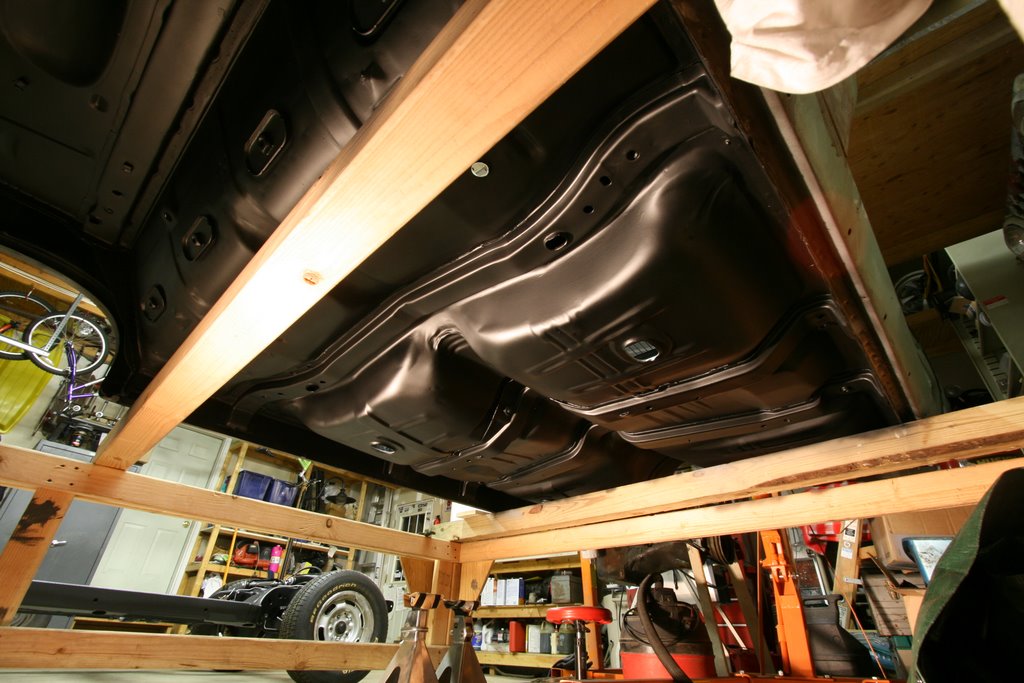
The lighting made the pans look a funny color, but they're black. The sheen I ended up with looks good. For every batch of LIMCO semi 900 I mixed, I added two big spoonfuls of flattener. Not very scientific, but each batch came out pretty nice.

After the bottom was done, I went nutty on the floors on the topside. More scraping, sanding and wire wheel grinding. Cleaning, metal prep and primer.
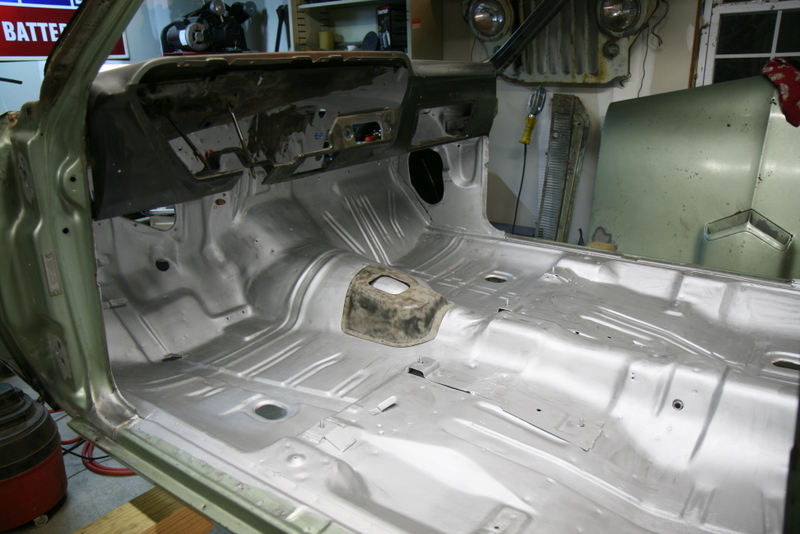
Note the shifter porch is blasted and ready for primer too.
I finally attacked the windshield to pull it out. It had been bonded in with urethane adhesive, and it seems this stuff is not meant to come out by any means we here on earth possess. It took HOURS of prying, chiseling, cajoling and crying to get this stuff out.
There was no hope on saving the glass, and I was worried about the trim (it was bonded to the urethane) but by some miracle, I got the trim off with no damage.
After finally pulling the windshield out, I found what I believe the last surprise the ol' girl has for me: old repairs to a few pin-holes in the windshield opening.

Check out the "Bodywork Part 3" to see work continue on the body.
If you have any comments of questions, please contact me:
SFS
Links:
Willys Jeep CJ3A Forum
There exists a nice set of webpages for CJ3A's. It's got a forum too that caters to both '3A's and CJ3B's. It's a great resource, and frequented by very knowledgible folks.
1967 GTO Original Owner
These two videos feature an original owner GTO. This car was featured in Hemmings Muscle Cars magazine a couple years ago. Part 2 has inside and outside shots of the owner driving the car. Very nicely done.
Blues Maker
"Mississippi" Fred McDowell. One of the great Bluesman. This is a documentary made in 1969.
Pinstripes
Pinstriping the ol' fashioned way. Pretty nice.
MGB Racecar
I've always liked MG's. Watch this MGB lift it's inside tire a few inches off the tarmac when going "'round the bend". Awesome.
Pepsi Throwback

Pepsi has put out a "limited edition Throwback" version of Pepsi with REAL sugar, instead of high fructose corn syrup which has been used since the 80's. Holy cow there IS a difference; it's WAY better. Find some quick!