
Projects:
GTO
My
67 Pontiac GTO
Trunk Body Work
-Trunk pans
-Wheel wells
Body Work Part 1
-Rear Quarters
-Rear Door Jambs
-Window Reveals
Body Work Part 2
-Cowl
-Pillar
-Rocker
Body Work Part 3
-Windshield channel
-Doors
-Fenders
GTO Paint
-Filler work
-Priming
-Blocking
GTO Frame Work
GTO Convertible Top Pt 1
-Top Frame
GTO Convertible Top Pt 2
-Top Trim
GTO Drivetrain
-Engine
-Quadrajet Rebuild
-Exhaust
-Axle
Muncie
Rebuild
popular
Auto to Manual Swap
1967
Ram Air GTO
story
Wheelhouse Filler template PDF
Willys CJ3A
CJ3A Intro
Engine and REBUILD
Drivetrain
BodyWork 1
BodyWork 2
BodyWork 3
BodyWork 4
Paintwork 1
Paintwork 2
Final Assembly
Final Assembly 2
Electrical System
Other Rods
TJ Wrangler Rubicon
CJ7
CJ8
Triumph TR4
Decrepid Dakota
Powerdyne Minibike
Allis Chalmers B engine rebuild Part 1
Allis Chalmers B engine rebuild Part 2
Allis Chalmers Generator to Alternator conversion
Gizmos
Stereo camera
rig
Stereo mic preamp
About:

Feeds

Markup
Frame Job
March 24, 2011
In a classic case of scope creep, the frame, suspension and drivetrain of the GTO have been reduced to elemental bits in order to clean, repaint, and refurbish. This was not originally planned, but the body and frame were separated in order to perform some cowl/shroud/door pillar work on the body. So, on the bright side, the deed does present an excellent opportunity to more easily refurbish the frame and suspension parts.
Additionally, the "body off" allows me to easily weld in the brackets required for the 4 speed conversion (convertible frames require crossmember tabs, which need to be moved for transmission conversions).
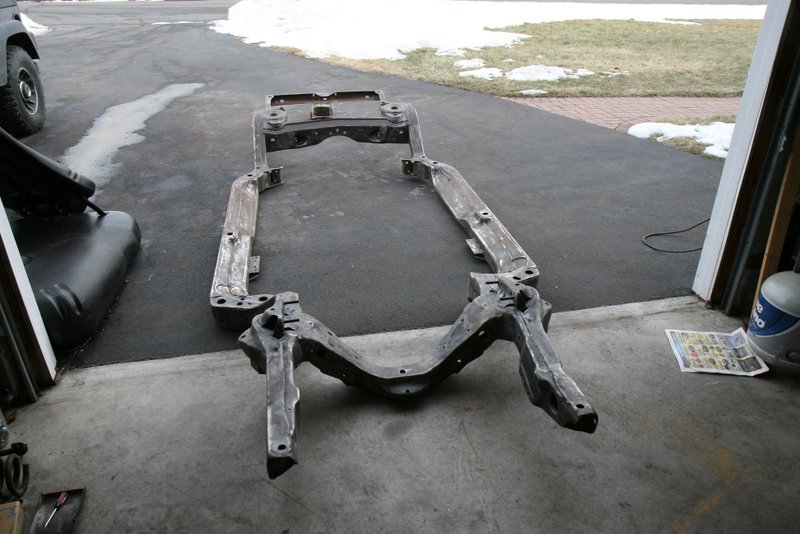
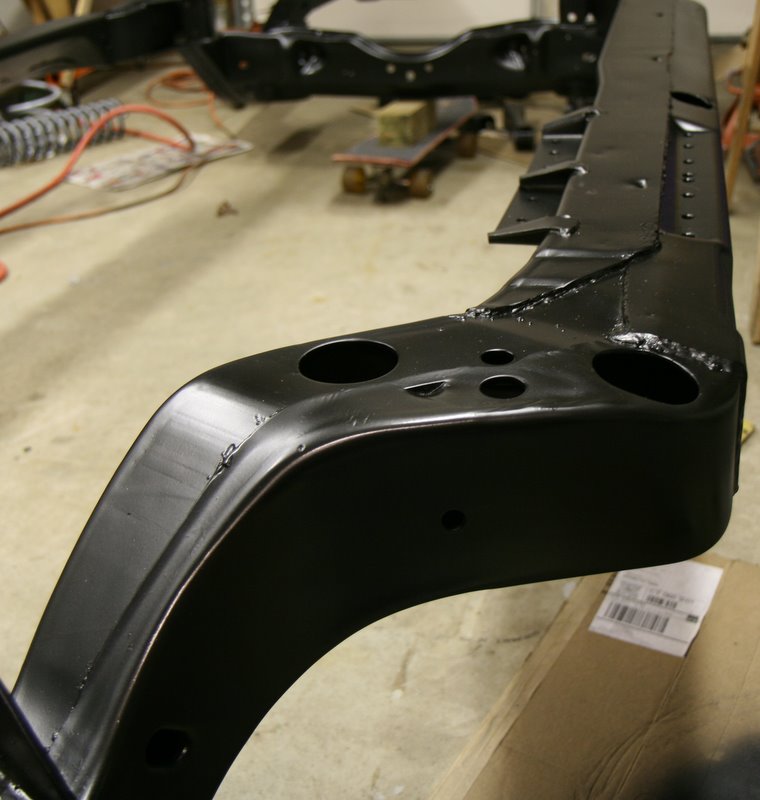
And finally, I always wondered why the bumper was offset a wee bit from the front end of the car (see pic below). Many cars this old have repair histories and I suspected that was the case here, I wanted to check out the frame very closely.

Prior to getting the body off the frame, I got back in touch with the previous owner who sold me the car in '87 (he purchased it in the mid 70's). So I was able to ask him about the history of the car. He told me that he never had an accident, but one of the front lower control arms broke when he was driving it one day (luckily at low speed). I suspect that the broken control arm might have had damage from an accident very early in the car's life. I haven't been able to trace ownership earlier, so I guess I'll never know for sure. On to the frame-off.
Body / Frame Separation
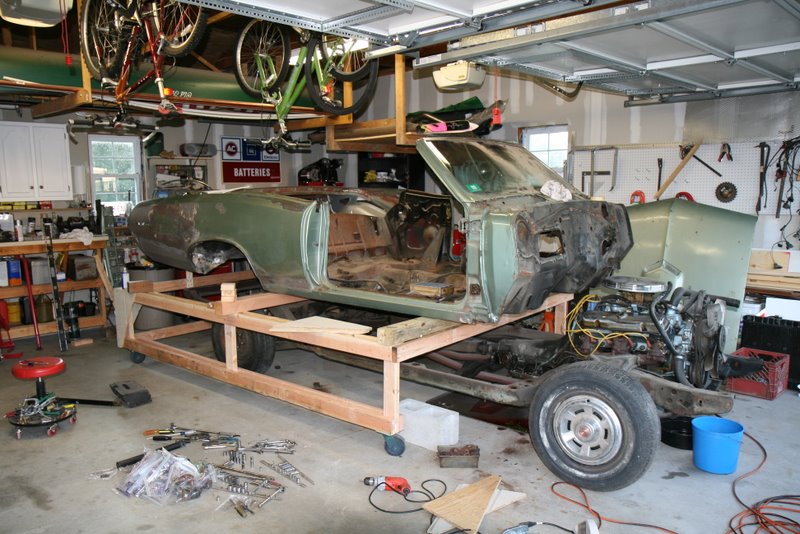
The body and frame were separated in June of 2010. All the body bolts were removed with no damage to the nut cages. The body was lifted onto a homemade wood cart, and it turned out to be perfect lo-buck solution. The body is resting on the rocker flanges and two small uprights at the back. Since it's resting on the rockers, I found no need to hassle with braces you see on rotisserie restorations. It's 8 feet wide, so there's plenty of room to step inside the cart "rails" to perform work, and narrow enough to get through the garage door for outside work like sandblasting.
Frame First Impressions
With the frame out in the light of day, I was very pleased to see the frame was in excellent condition with no rot or cracks. Using the '67 Service Manual for reference, and mason string for a centerline, I compared all my measurements, including the diagonals, to specification. Pontiac states the diagonals must match side to side.
From the engine crossmember back, all the diagonals were to within 1/16", but I found the ends of the front frame horns were both skewed toward the driver side by 1/2" from centerline.
Despite the skewed frame horns, the sheet metal
alignment was very nice. The core support mounts had enough adjustment
range to
move the front end sheet metal back to spec and it looked great. But
the bumper is obviously offset to the driver side, so I really wanted
to straighten the
frame horns.
I consulted a trusted bodyshop with frame racks to see what could be done. The owner was very nice and even gave me a tour of his busy shop. After explaining my situation, he told me that it would cost a load of money just to set the frame up, but he suggested that I could likely straighten out the frame horns myself with some ingenuity. We spent a few minutes discussing possibilities and I became convinced I could do this myself.
Frame Horn Straightening
Since I don't have a "rack" to fix the frame to, or any means of exerting force externally to the frame, I would have to use the frame itself to push and pull against. The driver side frame horn needed to be pulled toward the center of the car and I started on that side.
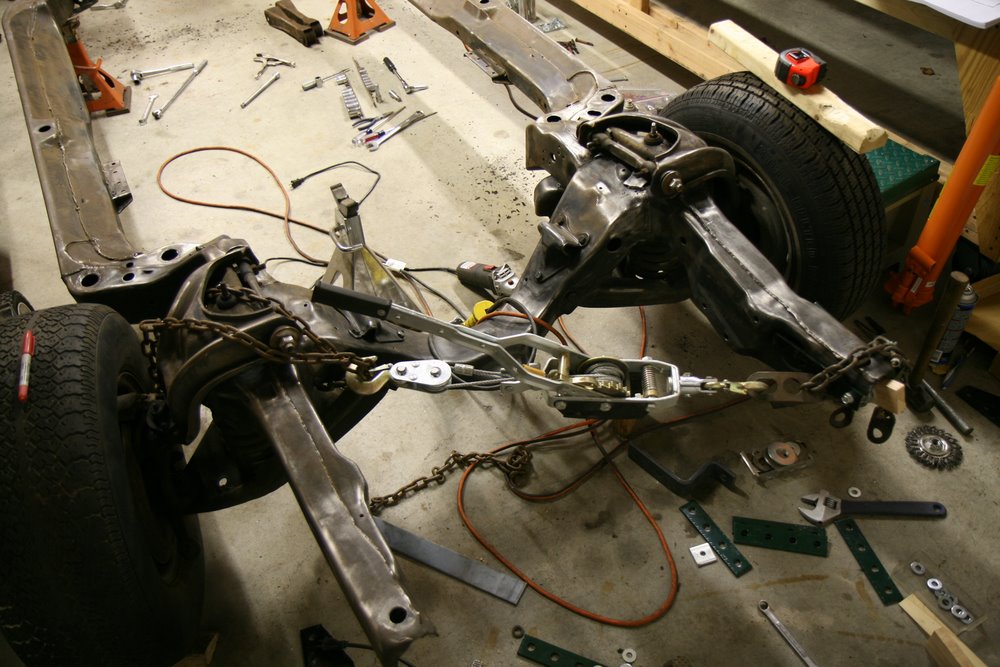
The only tool I had for pulling was an old come-along. I knew it would not have enough power alone to pull the boxed frame horn, but I figured I could exert some pulling force and add supplimental "persuasion" to exceed the elastic limit of the metal. The "persuasion" force I used came in the form of a sledgehammer. Yes, yes, even sledgehammers can be an elegant source of force, and would provide a nice spike in power to do the job.
I filled the frame horn end opening with hard oak and sheathed the outside of the frame with thick metal strap so that the side of the frame would not deform from the sledge impacts. One end of the come-along was chained up to the passenger side at the engine crossmember and the other hooked onto the driver side frame horn end. I pulled on the come-along handle as hard as I could which moved the frame horn end over a half inch toward the center. Releasing the come-along confirmed there is a huge "springback" and the come-along alone was not enough to bend the frame horn. I re-tensioned the come-along (with gritted teeth) and took some two handed swings at the horn with the sledge. Things started to move. I took some swings, retightened the come-along, then took some more swings. Each swing was worth about 1/16 of an inch. After a few iterations and measurement checks, I got the frame horn into perfect alignment. Set up took a couple hours (including head-scratching time), but the job itself took about a half hour.
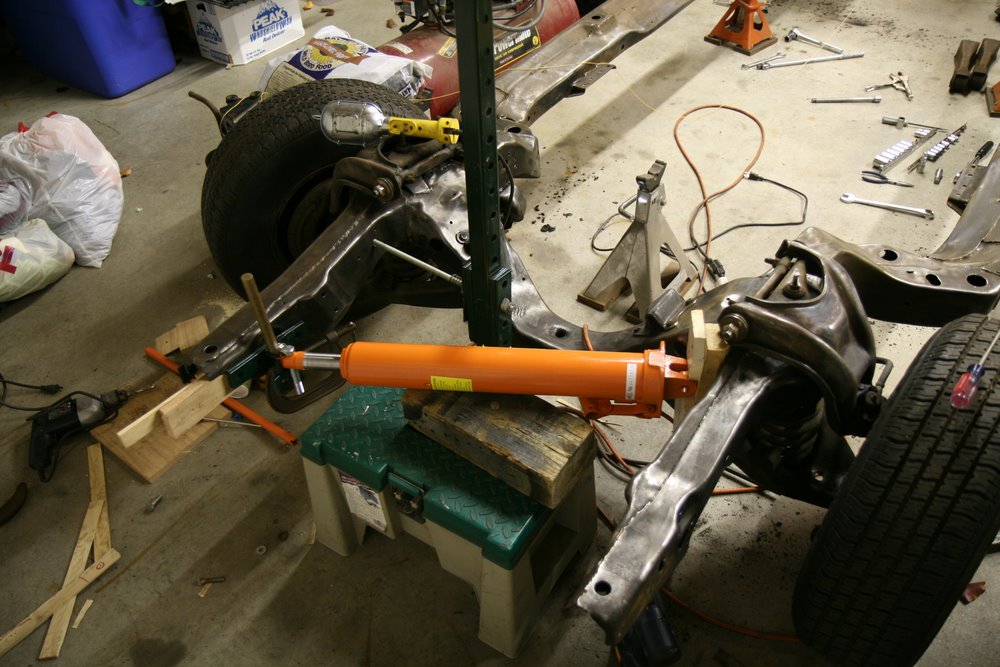
The passenger side was much easier because I only needed to place a hydraulic ram from my engine hoist into the crook of the driver side crossmember and push the passenger side frame horn end away from center back to correct position. I put the end of the ram into a chunk of wood that I formed to conform to the contour of the "crook" of the driver side crossmember. Like the other side, I had to push the frame horn beyond it's correct position in order to compensate for springback.
Both frame horns were now dead nuts and all diagonal measurements are within 1/16".
Right up until I finished, I still had reservations that this could be done by myself in my garage. But it is amazing what you can accomplish when you think about it and get creative on how to do it. Thanks to the bodyshop owner for giving me the inspiration to come up with this solution.
Frame Cleanup
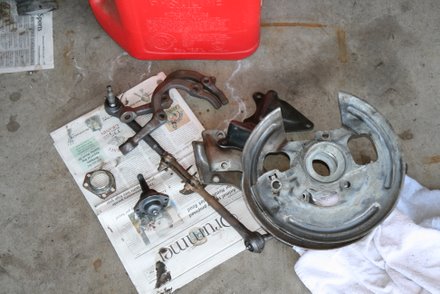
After the frame horns were corrected, I disassembled the rest of the suspension and removed the axle. Parts were degreased and the wirewheeling, sanding and sandblasting commenced. This was a lot of work and did not score high on the fun-o-meter.
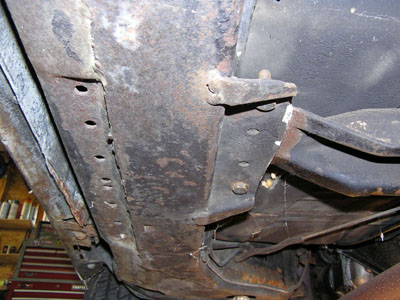
A couple front lower control arm mounting holes showed some wear from having loose bolts in the past and causing the bushing centers to wear into the frame. I welded up the depressions and ground them down to restore the thickness. Here's a shot of the fix before grinding (with the frame upside down to make the work easier)
4 Speed Conversion Work to the Frame
To see more transmission swap info, check out my 4 speed conversion page)
Hardtop frames have open "C" sections with all the crossmember bolt holes punched for either manual or automatic transmission locations. Convertible frames have the same holes, but they're covered up by the "boxing" plates.
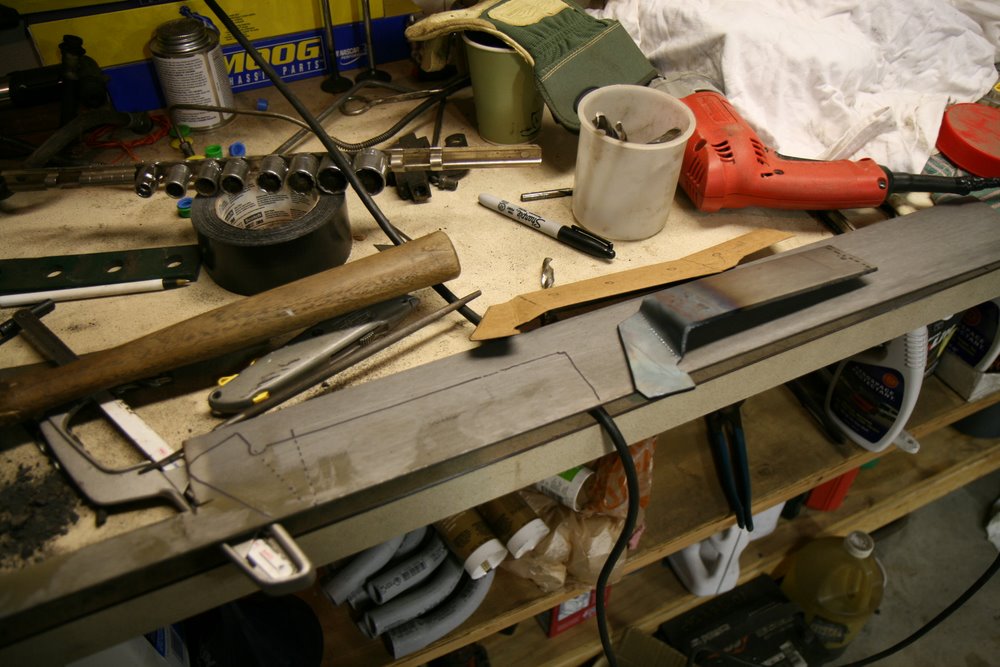
Pontiac welded external tabs onto the boxing plates (that's why convertibles have narrower crossmembers), but only put the tabs in one location or the other depending on what tranny it would be born with. To convert transmissions, a new tab must be welded onto the frame. I did not want to remove the original tabs and move them, so I made up some new tabs to make a large "uni-tab". If I want to go back to automatic someday, the original tabs will be ready. The covered-up holes can still be seen and were perfect reference points to align the new tab.
To make the tabs, I made templates with card stock to duplicate the original design. I bought a chunk of 1/8" plate steel, and cut out the shapes with my electric cutoff wheel. I bent the tabs into shape with a vise, hammer and some MAPP gas heat to make the bending easier.
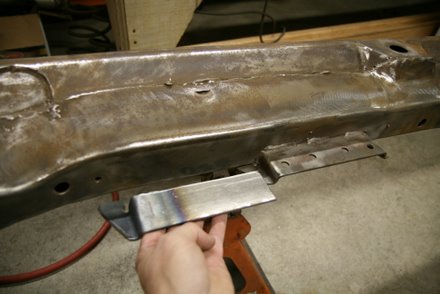
I duplicated the "stitch" welding that can be seen on the factory tabs.

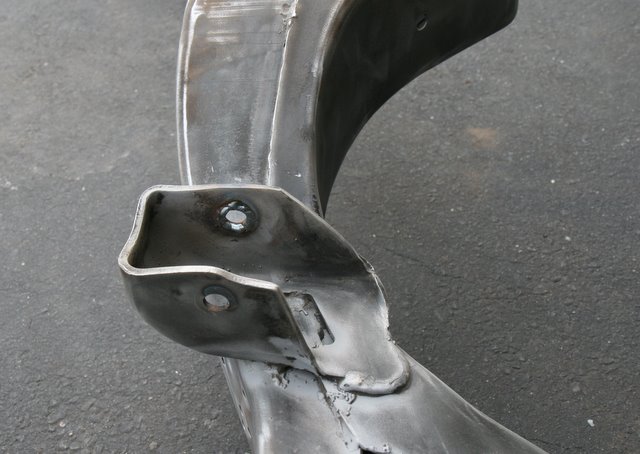
The holes were then drilled. The shot below is from underneath looking up. You can see the original "tab" on the left, and the new "tab-let" to the right (front). Observant readers may notice the two holes very close in the middle. I can't drill that hole near the center because it would cut into the flap going to the underside. I'll just use the existing rearward hole and modify the crossmember bushing bracket that bolts on top.

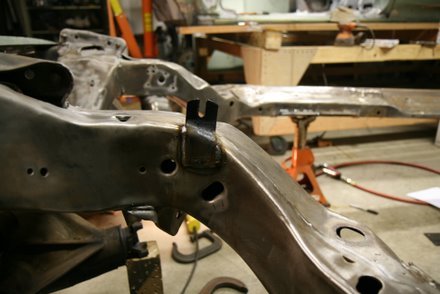
The Z-bar tab was welded onto the frame too:
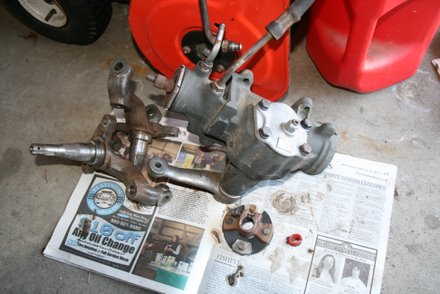
Suspension
Attention turned to sanding, wirewheeling and sandblasting control arms, spindles, brackets, etc. The rear axle was degreased and I found the "WG" stamp, indicating 3.36 open rear (as it should be), on the left axle tube. All the suspension parts are in great condition and will not be changed out, except for the lower ball joints and front upper control arm bushings. The tie rods and centerlink are tight and cleaned up nice. I found some inspection mark paint blobs on some parts, like red on the spindles, yellow on the axle, and I think some green on the tie rod sleeves.
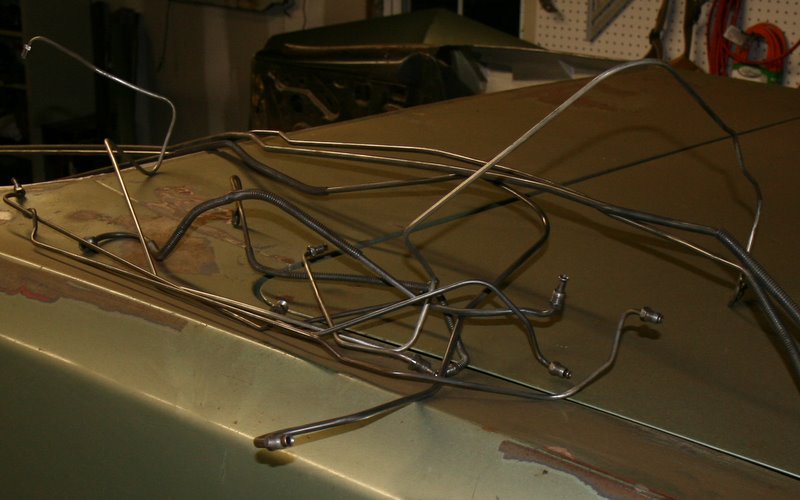
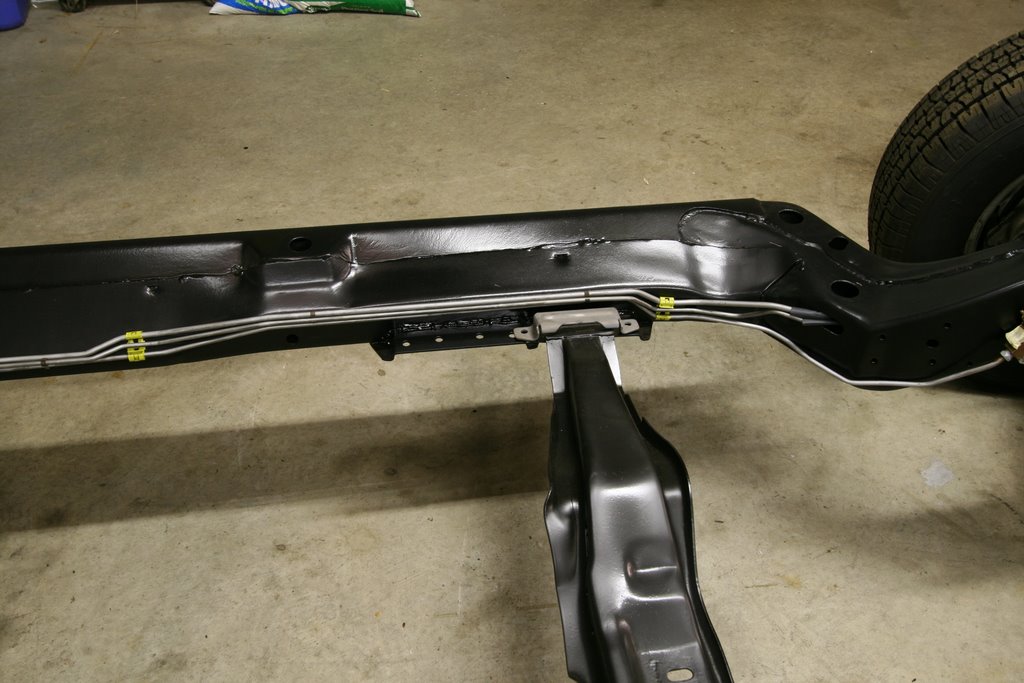
The gas and brake lines were mostly still covered with undercoating, so I spent a few hours wirewheeling every single gas and brake line. They are in terrific shape so I'm going to re-use them. I put a slight coating of master series silver primer and then wiped them down to dull the silver color down. I bought some flat clear and I'll put a coating of that on them.
Primer
After getting the frame prepped, I primed it with two coats of MasterSeries silver primer. It was the dead of winter and I was a bit nervous about using it in low temps. Turns out I was right. Next day I found the adhesion was terrible. I could scratch it off in a few spots, particularly in areas I had used metal prep. Another low score on the fun-o-meter ensued when I stripped the entire frame again. When I used the MS silver on some other parts in warm conditions, it had awesome adhesion, so I learned no more low temp painting.
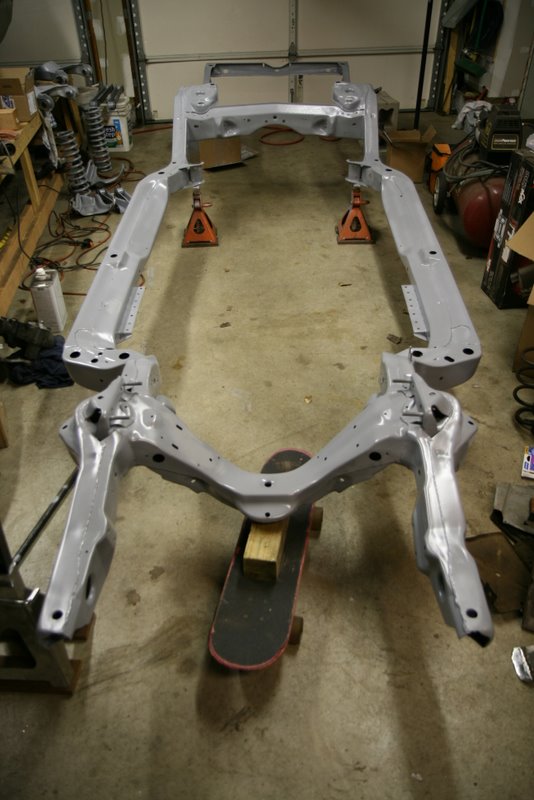
In addition to the MS silver, I covered the frame with some RM EP series epoxy primer. This is very nice stuff and it sands nice too. Here is the frame with a nice coat of epoxy primer.
May 18, 2011
Paint
I purchased some LIMCO 2-part urethane semi-gloss black for the frame and chassis parts. I haven't spray painted in over ten years, and my old siphon gun crapped out on me. I tried out a 10 dollar Harbor Freight gravity gun, but I just couldn't tune it to spray a nice finish. I gave up on that (for now) and in desperation tried a Harbor Freight detail spray gun I've had laying around. That thing sprays beautifully but turned out to be rather painful due to it's tiny spray coverage.
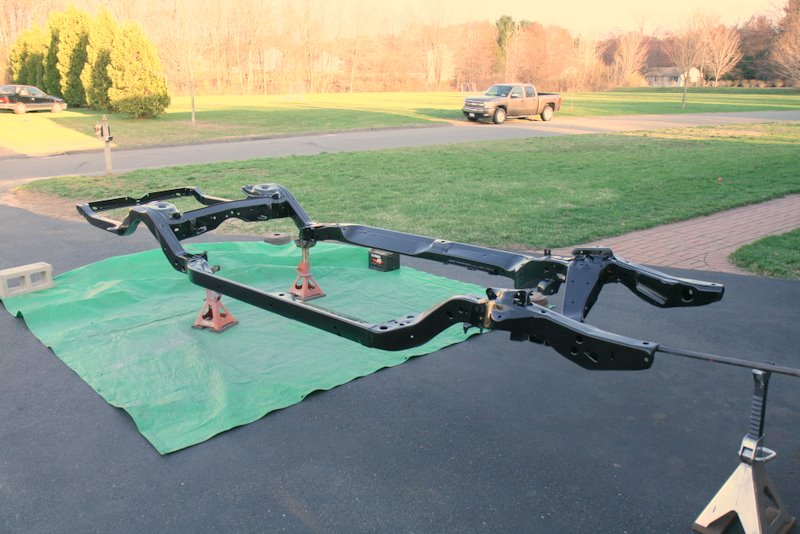
The topsides of the frame were painted with the troublesome guns, and the finish had some texture. I wasn't too concerned because the top-sides of the frame will be pretty much out of view when the body is on. The bottom surfaces were done with the detail gun and it looks better than new. Here's the bottom-side:
They must have used wire welders when this was built, I found a bunch of pieces sticking out of welds here and there. Lots of spatter too. I'm sure they had to whip through these things on the assembly line. I figured I'd leave the weld spatter as I found it. Kinda cool.
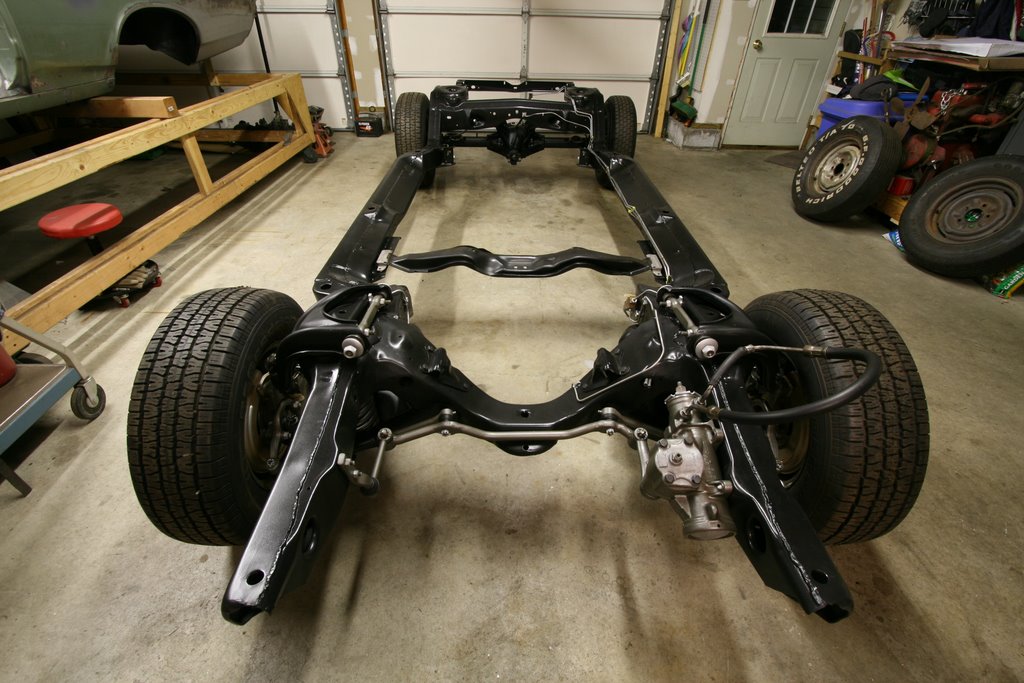
Frame Re-assembly
With the bare frame done, I attacked the rest of the parts. All the hardware was cleaned and then coated with a thin film of Master Series primer. I re-used just about everything, and it was all refurbished without any plating. I used just paints.
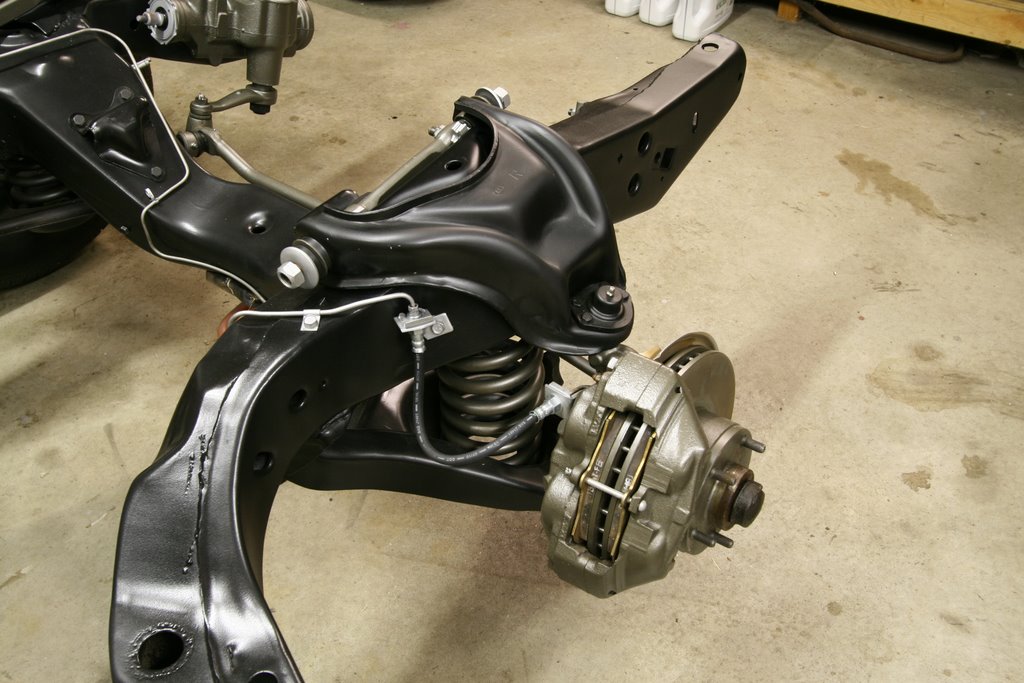
Re-assembly was pretty fun because everything was clean. I had a dickens of a time trying to put on the lower control arms because the springs are so hard to compress. I ended up putting the engine into the frame temporarily just to get some weight to hold the frame down and compress the spring with a floor jack under the A-arm.
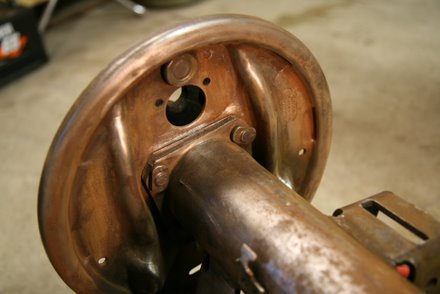
This is a disc brake car, and the shields were in tough shape. In the spirit of yankee ingenuity, I sand blasted them and painted them with master series primer, then fogged some gold paint in a few spots. Then I clearcoated the whole thing. Poor mans cadmium plating. I couldn't tell what they were plated with originally, but they will suffice as-is for now.
All the forged pieces and cast iron parts were painted with cast iron paint. I found the best stuff at Napa; a Dupli-Color Cast Iron engine paint. It was inexpensive at about 4 bucks a can and it sprays very nicely. The prices of Eastwoods aerosols keep me away as theirs is over 12 bucks a can (for less paint!)
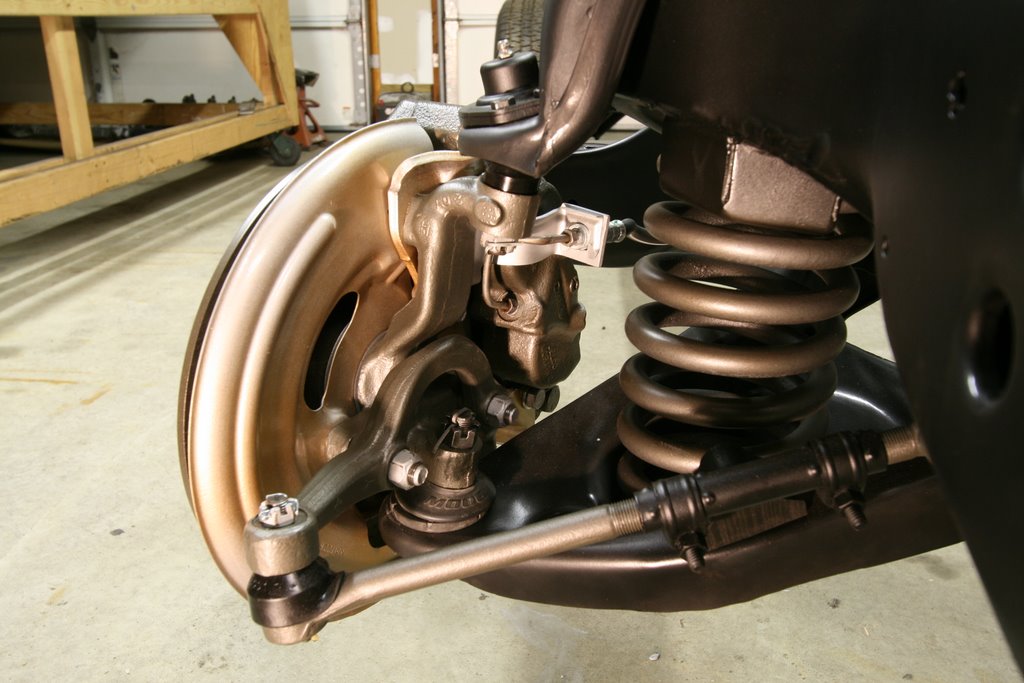
The springs are probably supposed to be fogged black, but I like 'em the cast iron color. The tie-rod sets were not taken apart, but cleaned then masked then painted. They cleaned up real nice. I used urethane tie-rod boots as I couldn't find rubber replacements. I see now AMES has 'em. I put the front end together with the alignment shims as I found them. I hope it's pretty close.
I intend to replicate the inspection paint marks I found while disassembling. I did find yellows and reds on the front end parts, but no pink paint on the rear axle ears.
Check out that 4 piston caliper. A real man's caliper. I replaced the originals with these stainless sleeved units 11 years ago. The rotors are also replacements. They are integral rotor/hubs. The originals were "2 piece", that is, the rotor bolted to the hub with 5 big bolts. I threw them away. Dope.
I re-used the original brake and gas lines. I did have to buy a couple new clips. The originals were yellow (under the grime), so these were painted the same. I re-used the black "S" clips and put them back the way I found them.
I installed the rear suspension components and proceeded to replace the pinion seal. I took the cover off to replace the gasket and found the diff case bearing preload non-existent as there is a gap instead. It's on the punch list.
Note how I replicated the black oxide coating of the fasteners, particularly on the rear cover bolts. I coated them with MS primer, then fogged some flat black paint on them. Looks just like black oxide coating.

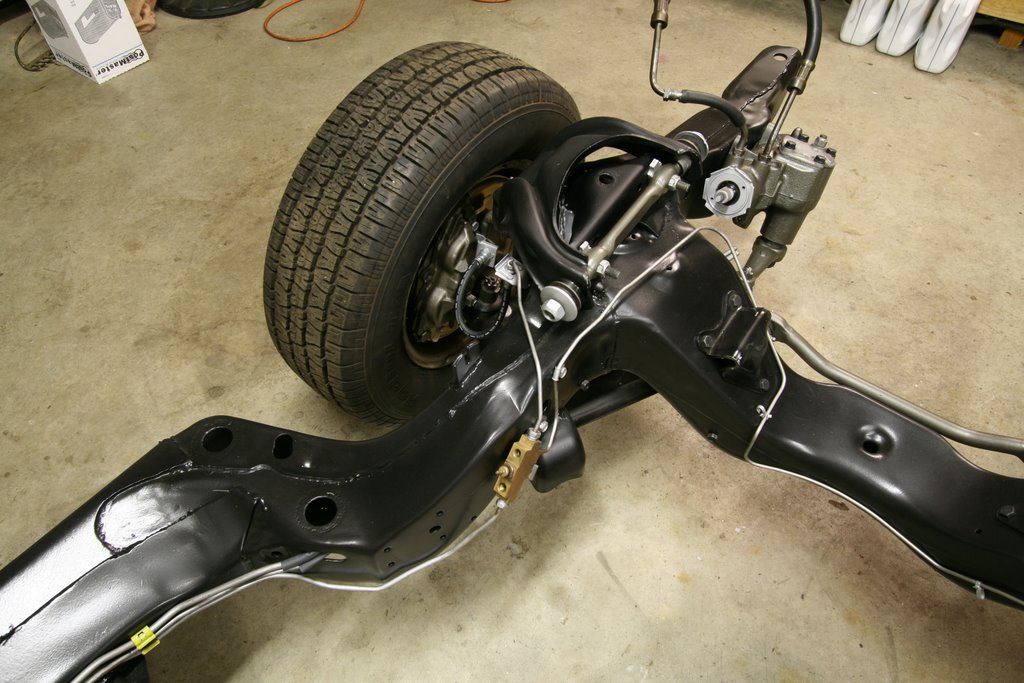
 I borrowed my son's wide angle lens to take the shot below. It
makes the 215 tires look like the "meats" of the classic tire
advertisements from the old days.
I borrowed my son's wide angle lens to take the shot below. It
makes the 215 tires look like the "meats" of the classic tire
advertisements from the old days.
I take these kind of shots manually; set the F stop high to get max depth of focus, and set the camera on a tripod. No flash.
The frame was finished and ready, and reunited with the body. See the "body drop" on the GTO Bodywork 3 page. Link below.
______________________________________
Any questions or comments email me:
SFS
Links:
Willys Jeep CJ3A Forum
There exists a nice set of webpages for CJ3A's. It's got a forum too that caters to both '3A's and CJ3B's. It's a great resource, and frequented by very knowledgible folks.
1967 GTO Original Owner
These two videos feature an original owner GTO. This car was featured in Hemmings Muscle Cars magazine a couple years ago. Part 2 has inside and outside shots of the owner driving the car. Very nicely done.
Blues Maker
"Mississippi" Fred McDowell. One of the great Bluesman. This is a documentary made in 1969.
Pinstripes
Pinstriping the ol' fashioned way. Pretty nice.
MGB Racecar
I've always liked MG's. Watch this MGB lift it's inside tire a few inches off the tarmac when going "'round the bend". Awesome.
Pepsi Throwback
Pepsi has put out a "limited edition Throwback" version of Pepsi with REAL sugar, instead of high fructose corn syrup which has been used since the 80's. Holy cow there IS a difference; it's WAY better. Find some quick!