
 I
use vintage 80's manual focus Minolta X-370 cameras for stereo
photography. This entails using two cameras side by side and tripping
the shutters simultaneously. The Minolta camera
shutters can be tripped in the usual way with the
finger switch on the top, or by a mechanical cable release in the
cable release socket. Up to now, I tripped the camera
shutters
with a homemade dual cable release. But moving or changing the
position of the cables introduced error in the synchronization, so I
thought about
tripping the shutters in a better way.
I
use vintage 80's manual focus Minolta X-370 cameras for stereo
photography. This entails using two cameras side by side and tripping
the shutters simultaneously. The Minolta camera
shutters can be tripped in the usual way with the
finger switch on the top, or by a mechanical cable release in the
cable release socket. Up to now, I tripped the camera
shutters
with a homemade dual cable release. But moving or changing the
position of the cables introduced error in the synchronization, so I
thought about
tripping the shutters in a better way.


Projects:
GTO
My
67 Pontiac GTO
Trunk Body Work
-Trunk pans
-Wheel wells
Body Work Part 1
-Rear Quarters
-Rear Door Jambs
-Window Reveals
Body Work Part 2
-Cowl
-Pillar
-Rocker
Body Work Part 3
-Windshield channel
-Doors
-Fenders
GTO Paint
-Filler work
-Priming
-Blocking
GTO Frame Work
GTO Convertible Top Pt 1
-Top Frame
GTO Convertible Top Pt 2
-Top Trim
GTO Drivetrain
-Engine
-Quadrajet Rebuild
-Exhaust
-Axle
Muncie
Rebuild
popular
Auto to Manual Swap
1967
Ram Air GTO
story
Wheelhouse Filler template PDF
Willys CJ3A
CJ3A Intro
Engine and REBUILD
Drivetrain
BodyWork 1
BodyWork 2
BodyWork 3
BodyWork 4
Paintwork 1
Paintwork 2
Final Assembly
Final Assembly 2
Electrical System
Other Rods
TJ Wrangler Rubicon
CJ7
CJ8
Decrepid Dakota
Powerdyne Minibike
Allis Chalmers B engine rebuild Part 1
Allis Chalmers B engine rebuild Part 2
Allis Chalmers Generator to Alternator conversion
Gizmos
Stereo camera
rig
Stereo mic preamp
About:
Feeds

Markup
DIY Electronic Shutter Release for the Manual Minolta SLR
Introduction
The X-series manual Minolta SLRs I'm familiar with utilize an electro-magnetic shutter controlled with an electronic circuit. While the cable release socket on the side of the body functions with a standard mechanical cable, I found that the cable release socket can also function electrically.
The cable release socket on the camera body has inside an electrically "hot" tab that, when grounded, trips the shutter. So the shutter trip can happen in two different ways:
1) A standard mechanical plunger type cable release can be installed into the socket, and when you push the plunger, the cabke tip goes in, pushes the electrically "hot" tab to ground, and consequently trips the shutter.
2) An isolated electrical wire can be installed into the cable release socket with a conductive tip, and when you simply short the other end of the wire to the camera ground, the shutter trips.
Minolta had a remote shutter release system called the IR-1 which used a remotely held infrared source transmitter unit to trigger a receiver base unit placed near the camera body. The receiver base unit was attached to the camera cable release socket with an electrical cable. I have not seen this system first hand, but I believe the IR-1 electrical cable shorted the internal tab to ground.
After probing the tab inside my X-370 and shorting it to ground, I found that the electrical method works. I decided to make a pair of electrical contact mechanisms which plug into the cable release sockets.
Description
My concept is to position an insulated wire through a cable release ferrule (or jack) so that it touches the electrically "hot" tab inside the socket. The insulated wire can be wired through a normally open (NO) momentary switch to the camera electrical ground. The tab should now be easily grounded through the external switch to trip the shutter.
In considering a "homemade" cable ferrule with an electrical wire tip, it is important that the wire tip of the cable go deep enough into the socket to contact the tab, but not so far that it pushes the tab down to the electrical ground behind it. I'm sure Minolta had a specified length for the tip of the IR-1 "jack", but since I don't know it, I'll have to figure it out.
 Rather than go through
trial and error with different length tips, I devised a mechanism in
order to adjust the depth of the wire tip as it comes out of the cable
release housing. It is comprised of a nylon screw with an integral
insulated wire which can be threaded in and out of the cable release
jack. A standard cable release jack is used, but it is
modified
to incorporate a threaded bushing so the nylon screw can thread in and
out.
Rather than go through
trial and error with different length tips, I devised a mechanism in
order to adjust the depth of the wire tip as it comes out of the cable
release housing. It is comprised of a nylon screw with an integral
insulated wire which can be threaded in and out of the cable release
jack. A standard cable release jack is used, but it is
modified
to incorporate a threaded bushing so the nylon screw can thread in and
out.
The Details
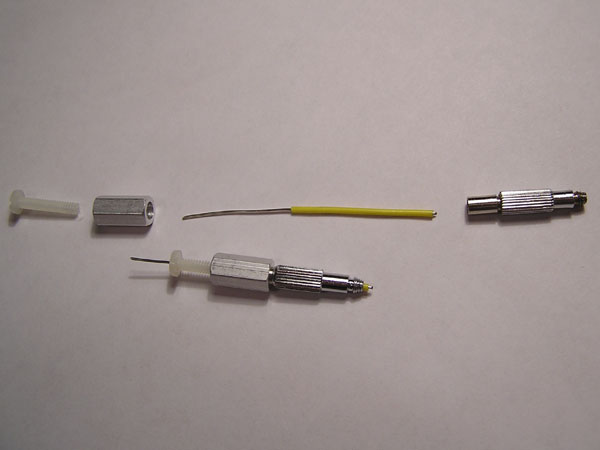
 First,
I harvested a couple of threaded
ferrules (jacks) from some regular ol' cable releases. The two I
harvested were glued and the mechanical cables and tubes came off with
a firm
tug. The old glue was then cleaned out of the I.D. of the ferrule
sleeve.
First,
I harvested a couple of threaded
ferrules (jacks) from some regular ol' cable releases. The two I
harvested were glued and the mechanical cables and tubes came off with
a firm
tug. The old glue was then cleaned out of the I.D. of the ferrule
sleeve.
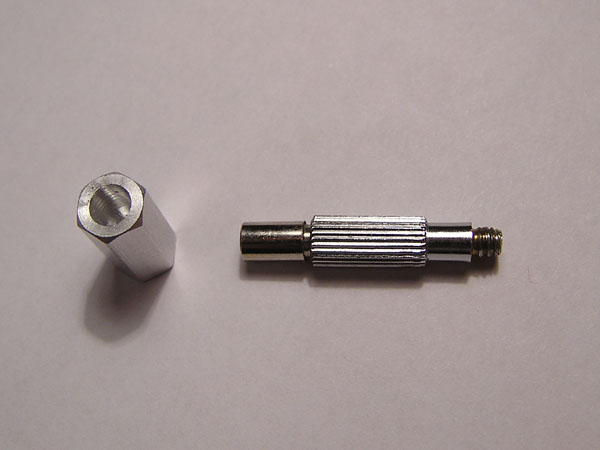 A
threaded bushing (a
4-40 threaded hex stand-off) is
affixed to the sleeve of a "harvested" standard cable release
jack. One half of the I.D. of the bushing is drilled out in
order
to slip-fit over the cable release sleeve. The photo on the right
shows the standoff with its bored out I.D. facing up.
A
threaded bushing (a
4-40 threaded hex stand-off) is
affixed to the sleeve of a "harvested" standard cable release
jack. One half of the I.D. of the bushing is drilled out in
order
to slip-fit over the cable release sleeve. The photo on the right
shows the standoff with its bored out I.D. facing up.
 The bushing is bonded to
the ferrule sleeve.
The bushing is bonded to
the ferrule sleeve.
 The
center of a 4-40 threaded nylon screw is drilled out to allow
a solid core 22 AWG wire to pass through. I
had access to an ancient mini lathe to drill out the screw, so I got
fancy and drilled two different sizes to make a shoulder for the
insulation to bear against. It would be fine to have the larger bore
all the way through and just epoxy the insulated wire into the screw.
The dashed lines shown illustrate the bore.
The
center of a 4-40 threaded nylon screw is drilled out to allow
a solid core 22 AWG wire to pass through. I
had access to an ancient mini lathe to drill out the screw, so I got
fancy and drilled two different sizes to make a shoulder for the
insulation to bear against. It would be fine to have the larger bore
all the way through and just epoxy the insulated wire into the screw.
The dashed lines shown illustrate the bore.
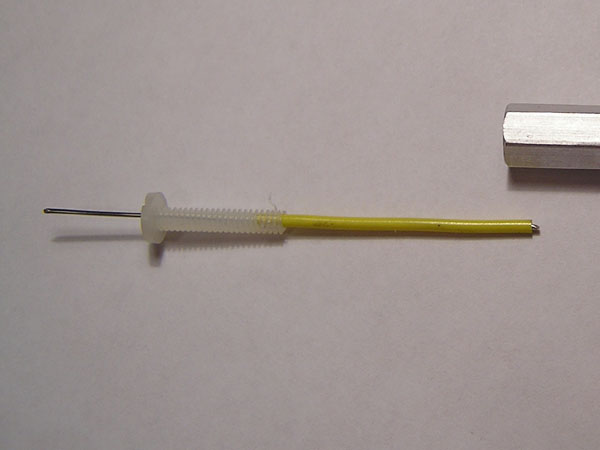 22 AWG solid wire is
employed since it's stiff, and the O.D.
of the insulation fits nicely in the bore of the cable release jack.
The end of the wire which will contact the tab inside the camera is
stripped to expose about 1 mm. The output end of the wire
passes through the screw and can be terminated to your switch.
The wire is bonded to the screw.
22 AWG solid wire is
employed since it's stiff, and the O.D.
of the insulation fits nicely in the bore of the cable release jack.
The end of the wire which will contact the tab inside the camera is
stripped to expose about 1 mm. The output end of the wire
passes through the screw and can be terminated to your switch.
The wire is bonded to the screw.
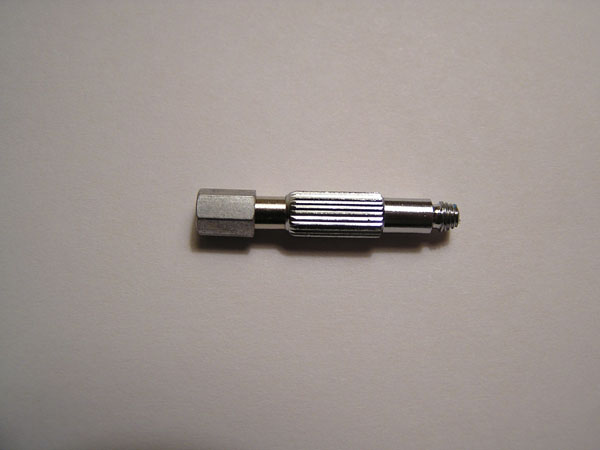
 The
nylon screw/wire assembly can now be threaded into the bushing and
screwed in or out
to adjust the depth of the wire relative to cable release jack.
The
nylon screw/wire assembly can now be threaded into the bushing and
screwed in or out
to adjust the depth of the wire relative to cable release jack.
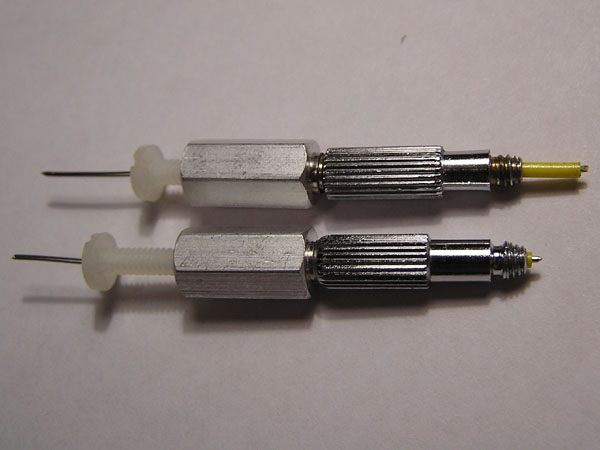 Here
you can see they have quite a range of adjustability for wire depth. It
works fine, but after I was finished with this pair, I
decided
to scale down the gizmo and use a shorter bushing, and a shorter nylon
screw.
Here
you can see they have quite a range of adjustability for wire depth. It
works fine, but after I was finished with this pair, I
decided
to scale down the gizmo and use a shorter bushing, and a shorter nylon
screw.
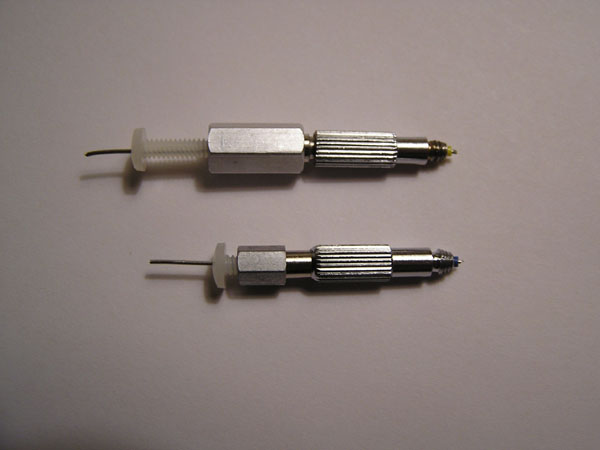 On the bottom is a new
smaller assembly; it's concept is the same, but it's shorter, and
doesn't stick out as far. It'll be less prone to being snagged during
use in the field.
On the bottom is a new
smaller assembly; it's concept is the same, but it's shorter, and
doesn't stick out as far. It'll be less prone to being snagged during
use in the field.
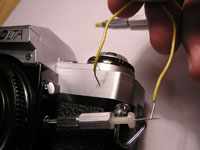
 Here is the device
installed on my Minolta X-370. I have not yet wired the
output wire lead to a switch.
Here is the device
installed on my Minolta X-370. I have not yet wired the
output wire lead to a switch.
To install and adjust the wire tip depth:
Before installing, back off the nylon screw/wire assembly so the tip is flush with the end of the "jack". Install the cable release jack firmly into the cable release socket of the camera. Advance the film lever and turn the camera on. Turn the nylon screw/wire assembly in until the shutter trips. This finds the limit of how deep the wire mechanically goes to push the tab to the internal ground. Back off the screw/wire assembly 1.5 turns. Backing off the wire keeps the tab from being too close to the internal ground, but not so far that the wire tip loses contact with the tab. You may have to experiment with how much to back off the nylon screw, especially with different "X" Minolta cameras. Once the wire tip is adjusted, it should not be necessary to adjust it again.
 To test the cable
release electrically:
To test the cable
release electrically:

Make sure the camera is on. Advance the film lever. Using a switch or simply a jumper wire, short the cable release wire to the camera ground. The top metal cover as well as the bottom are case ground. The shutter should trip.
If testing is successful, you can now wire up any ol' type of switch you'd like.
I have not yet tried how a latching switch works on the bulb setting. I'll check it out and update...
Parts List:
- The "harvested" threaded cable release ferrules
- A 0.250" width hex standoff(bushing) x 0.375" length, with a 4-40 internal thread, or use whatever standoff/bushing you can scrounge.
- A 4-40 thread x 0.5" length panhead nylon screw
- A length of 22 AWG solid core wire
Links
Camera Ego I came across this website within days of coming up with my electronic cable release. The author came up with the same concept for tripping the shutter. The author also came up with a very cool remote release by using an RF doorbell kit.
Minolta Manual Focus This is a Yahoo Groups message board for fans of manual focus Minolta equipment. Several members were extremely helpful with my Minolta questions.
SFS
Links:
Willys Jeep CJ3A Forum
There exists a nice set of webpages for CJ3A's. It's got a forum too that caters to both '3A's and CJ3B's. It's a great resource, and frequented by very knowledgible folks.
1967 GTO Original Owner
These two videos feature an original owner GTO. This car was featured in Hemmings Muscle Cars magazine a couple years ago. Part 2 has inside and outside shots of the owner driving the car. Very nicely done.
Blues Maker
"Mississippi" Fred McDowell. One of the great Bluesman. This is a documentary made in 1969.
Pinstripes
Pinstriping the ol' fashioned way. Pretty nice.
MGB Racecar
I've always liked MG's. Watch this MGB lift it's inside tire a few inches off the tarmac when going "'round the bend". Awesome.
Pepsi Throwback

Pepsi has put out a "limited edition Throwback" version of Pepsi with REAL sugar, instead of high fructose corn syrup which has been used since the 80's. Holy cow there IS a difference; it's WAY better. Find some quick!